How to set up Shopify store’s complete guide for all types of business niches and budgets. This will be a long-form post dealing with common questions we collect from our customers. So, take your time to dig deep and jump to any section you want to read first by showing What You’ll Learn table of contents.
What You'll Learn
ToggleMust-haves to know how to set up Shopify store
Before you can get your hands on how to set up Shopify store, you are supposed to have the following essentials.
- At least 1 product image. To help customers easily make a purchase, they should see what they’re shopping for.
- Store name. Try to come up with a memorable name, especially when you decide to buy your domain name. You can also change the name later at any time.
- Store logo. If you’re a well-established company, you might already have your own logo. If not, you should design a logo to promote your brand. You can use Shopify logo creator – Hatchful to get a simple one.
- More images. An image is worth a million words. Visual content is critical to your company’s success. You are advised to upload high-resolution images that help define your store and clearly show how your products work. This will facilitate the online purchasing process. You can upload your images or choose free images from Burst – Shopify’s image library.
- Package weights & sizes of each product. To help you estimate more accurate shipping costs.
If you have already prepared these must-haves, you know the fundamental of how to set up Shopify store.
Kick off your 14-day free trial on how to set up Shopify store
You won’t know how to set up Shopify store if you don’t begin a free trial. This 2-week free trial allows you to do almost everything to set up your store (e.g. customize the look and feel of your store, add products, and create product collections).
You need to enter your email address, password, and store name to begin your free trial. You will get a free default domain with myshopify.com to get started. Visitors won’t access your Shopify store until you get a custom domain.
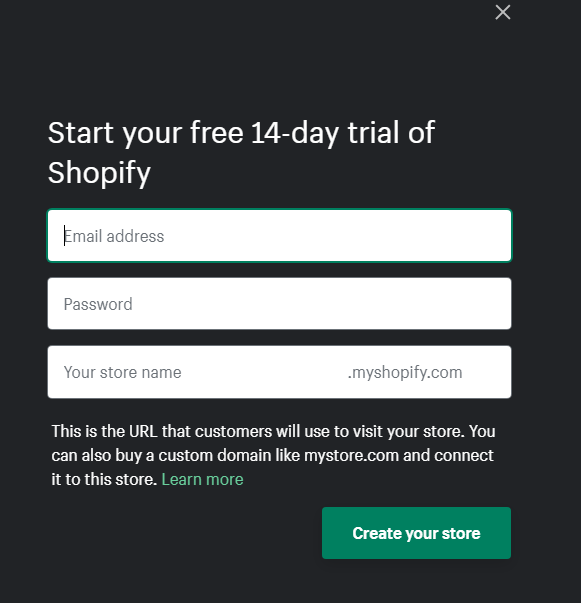
I will guide you through how to buy a custom domain later on. After you have clicked “Create your store”, Shopify will ask you some questions to know your business better. Try to answer the questions as correctly as possible.
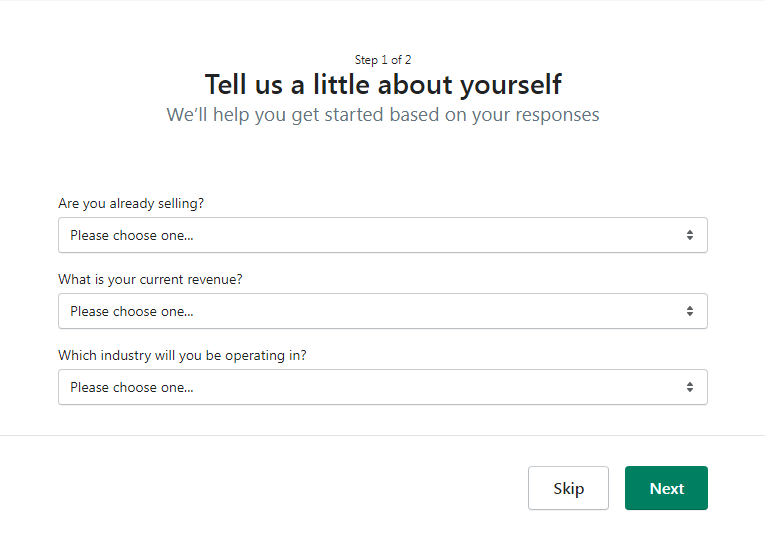
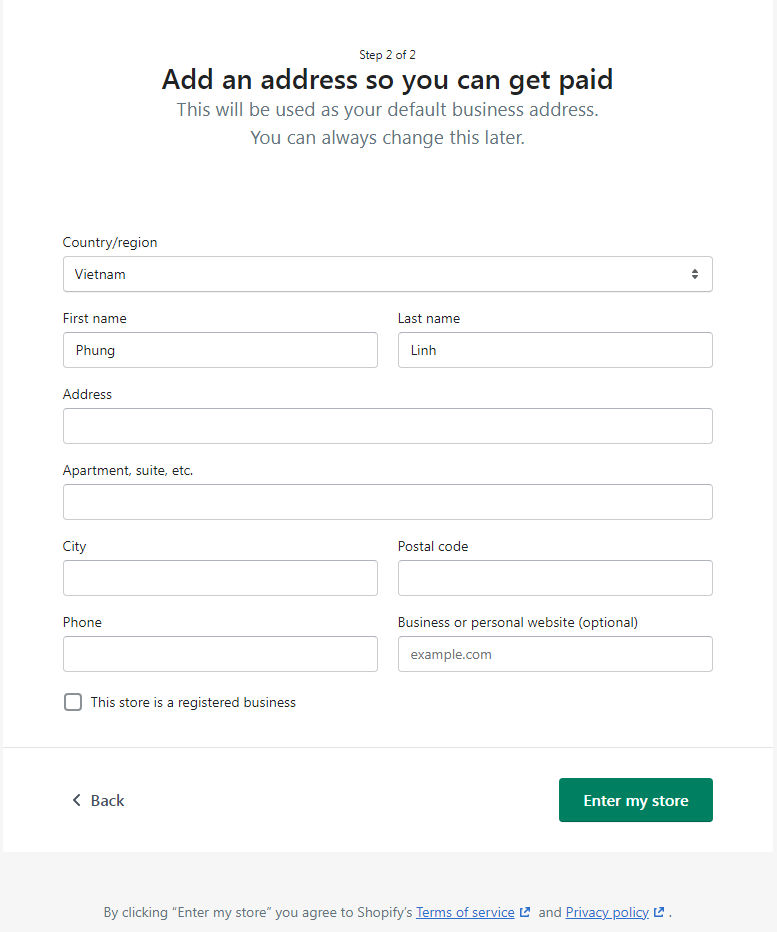
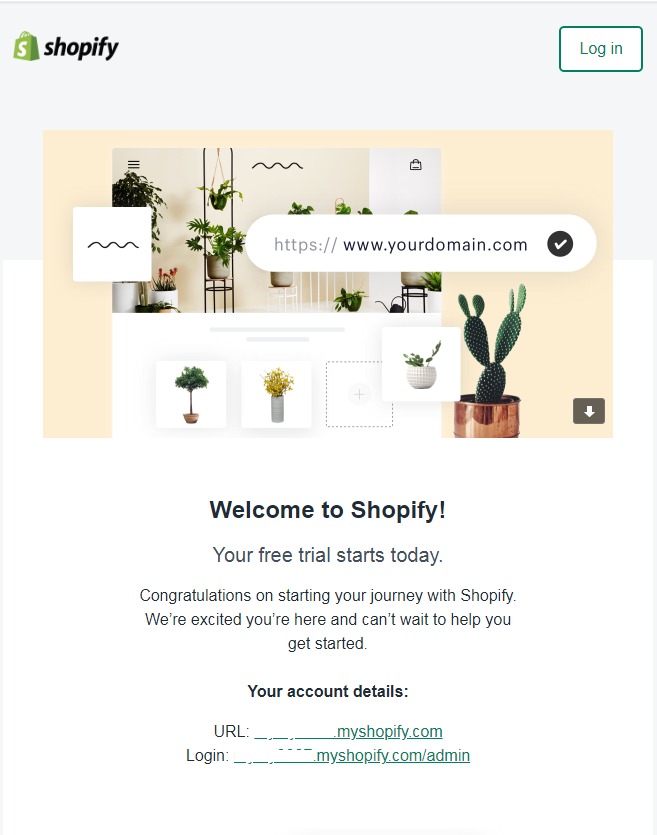
Congratulations! You’ve taken the very first step in building your store. You will also get a confirmation email to keep your business secure and tips on how to set up Shopify store with success.
How to add products to Shopify
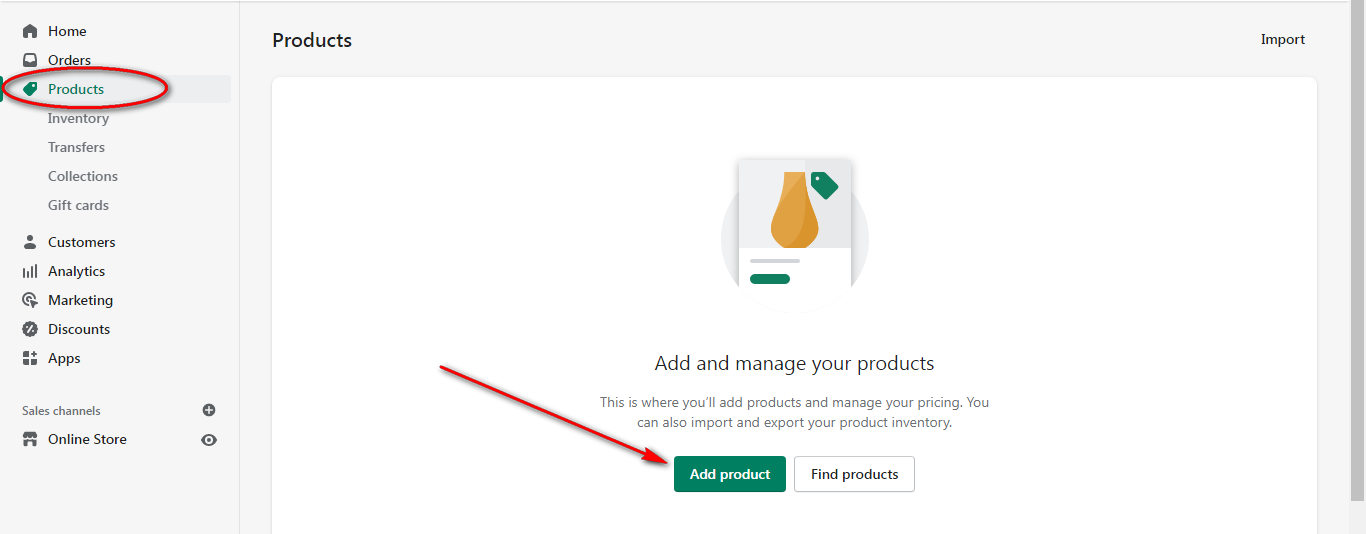
Adding products is the most critical step of how to set up Shopify store. On the left sidebar menu of Shopify admin, click “Products” then select “Add product”.
The title and description
You should put yourself in your customer’s shoes while doing this. You need to describe your product’s characteristics and benefits in the product description. Because a buyer can’t truly experience your product before buying it, you’ll want to make sure they realize how it will solve their problem. Make the copy scannable by using bullet points and using spell check.
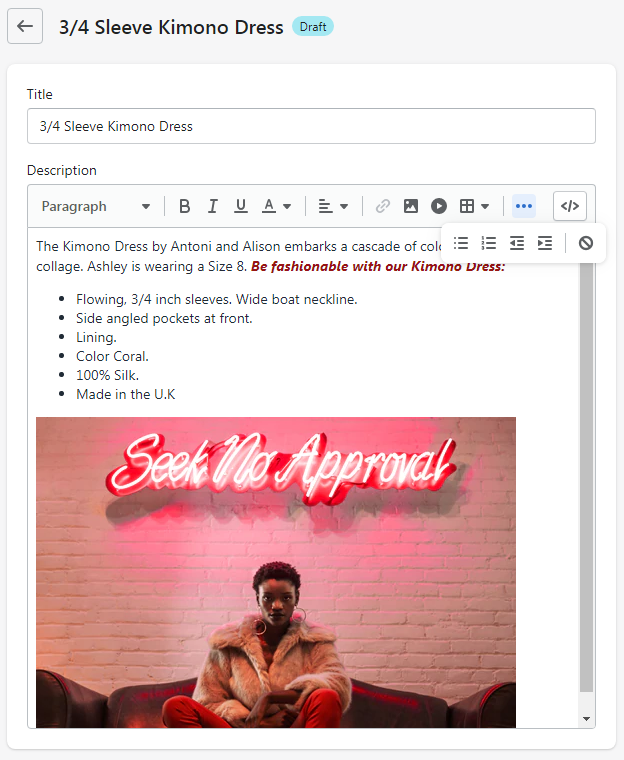
Also, you should add keywords in the description to increase your ranking place. Keywords are words/phrases that potential customers type into a search engine (notably Google) to find a product like yours.
Media
You can upload media from your computer or add from a URL. Shopify accepts images, videos, and 3D models. The first image is the featured image that appears on the home page, collection page, cart page, and checkout page.
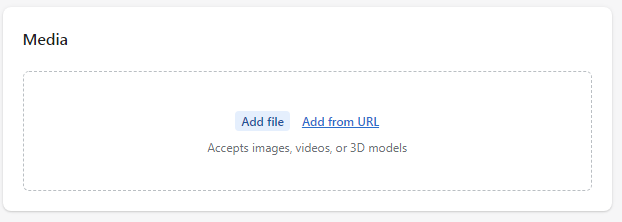
Make sure the product images are smaller than 20 megabytes, like collection images.
You should also add alt text to assist visually impaired visitors. Plus, search engines need the alt text to figure out what’s in the image and show it in image searches.
- Choose the image you want to add alt text to open the image editor.
- Select “Add alt text” and type alt text. The alt text should be short and sweet (~125 characters) and contain keywords.
- Select “Save alt text” and click “X” to close the image editor.
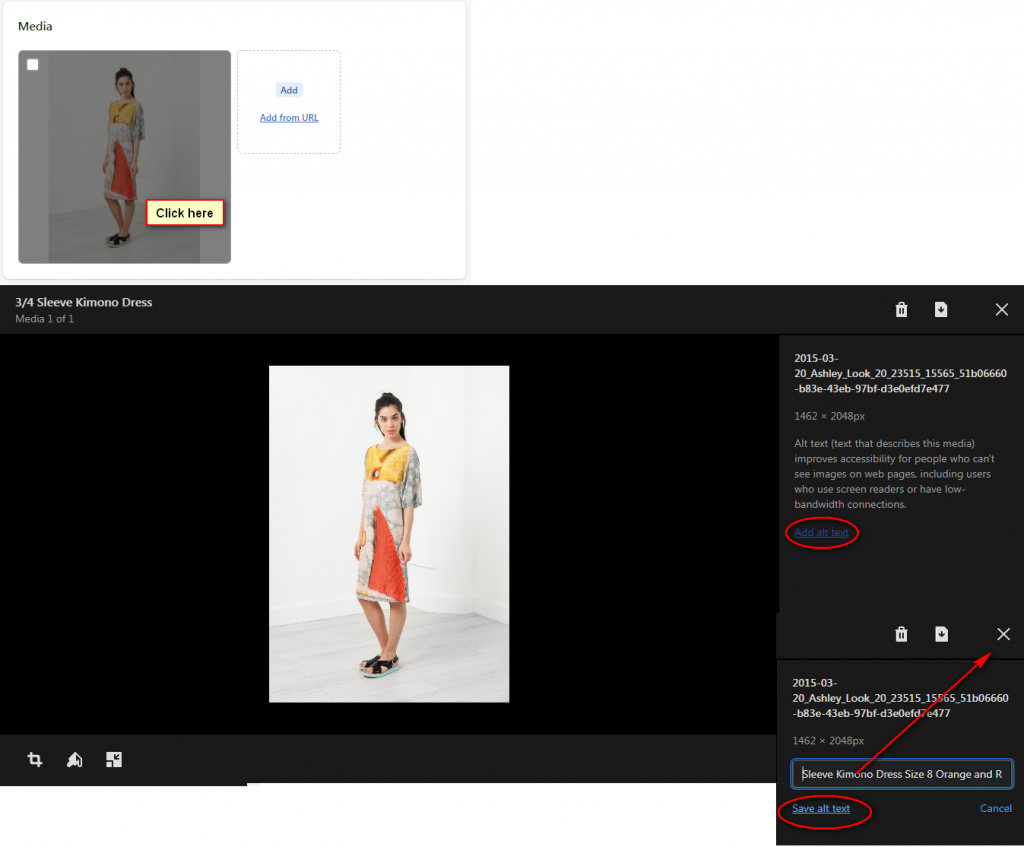
In the image editor, you can crop, rotate, draw, resize, delete, and download images.
Now, you might say: “Ok, I know the importance of alt text. But how could I manually add alt text to hundreds of images?”. Here’s the solution. You can install an app to help you automatically add image alt text such as the Image Optimizer app. Later on, you’ll show you how to install a Shopify app.
Pricing
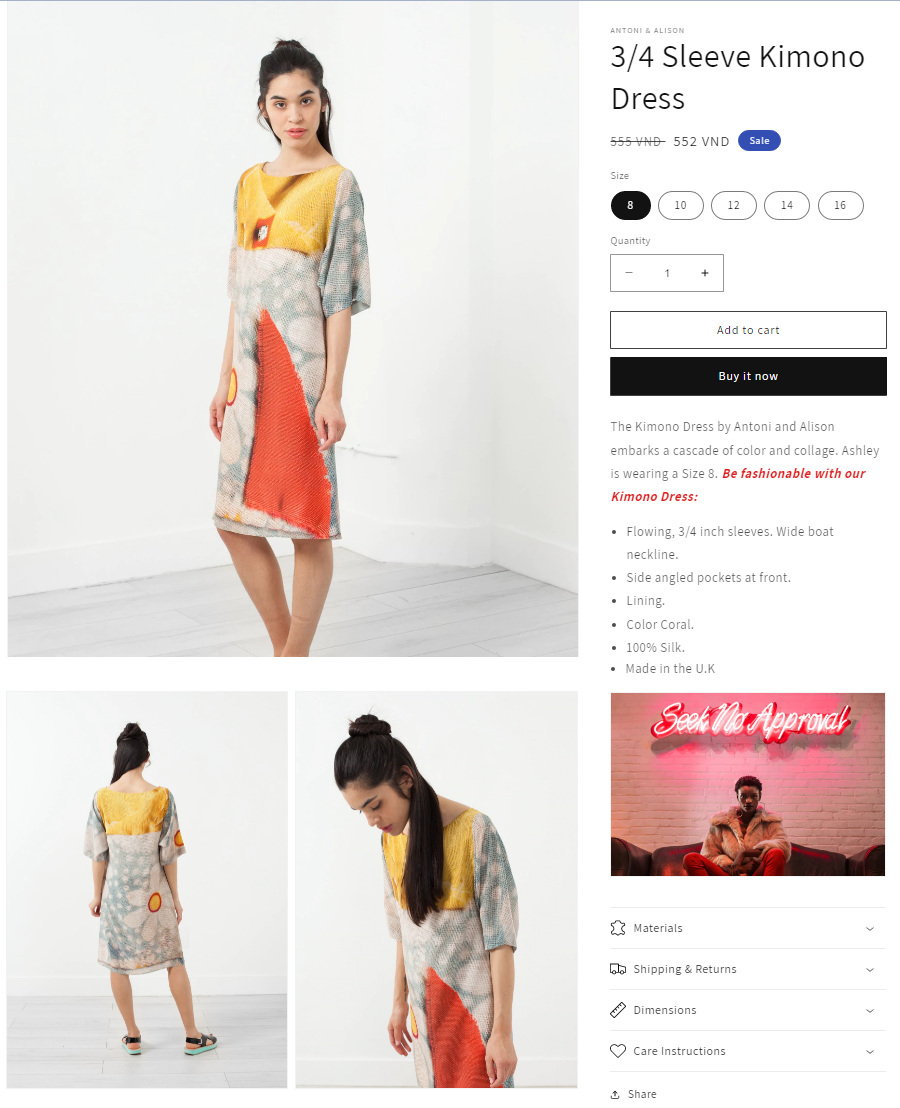
Next is setting a price for your product. One interesting thing about Shopify pricing is that you can show a reduced price. Type the original price into “Compare at price” and type a lower price into “Price”. When you do so, Shopify will automatically display a Sale badge for customers to notice it.
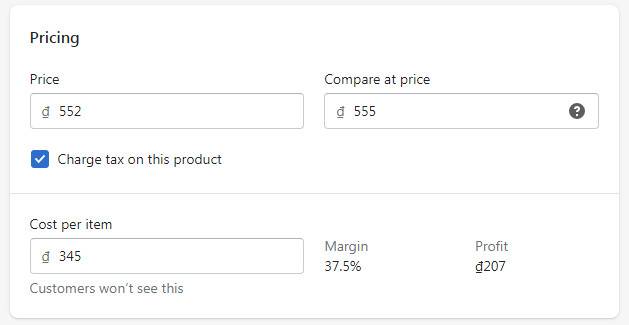
Tick the box “charge tax on this product” if the product has tax. Type into the “cost per item” to get a margin and profit auto calculated by Shopify.
Inventory
If you’re unfamiliar with SKUs, you should create a format that sounds plausible to you. I can attest to the fact that these are beneficial in the long term. There’s also the option of using barcodes. Shopify can help you track your inventory.
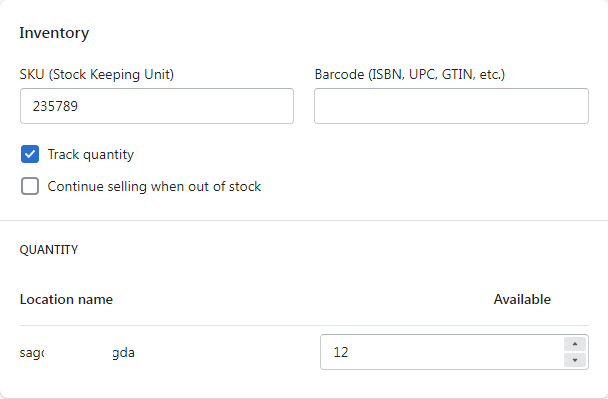
You can choose to continue selling even when the product is out of stock. After that, enter the total quantity of items you have on hand. You may add a site and different inventory for each site if your items are distributed across numerous sites.
Shipping
If the product is a tangible one that has to be transported, tick “This is a physical product”. Leave this unchecked if you’re offering digital items or services that don’t get sent by mail. By analyzing the weight, size, and shipment distance, the shipping settings assist determine shipping rates at checkout and label costs during fulfillment.
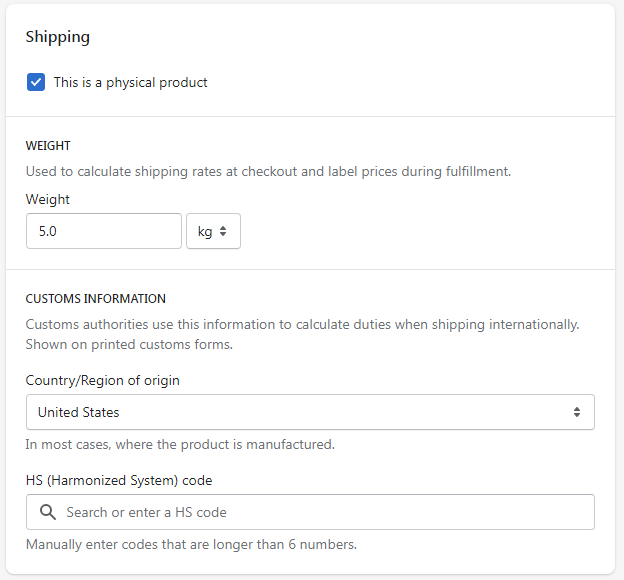
Add customs information (Country/Region of origin and Harmonized System code) if you sell internationally. Customs uses this to guarantee that the appropriate tariffs are charged on overseas orders, helping speed up the customs process.
Options
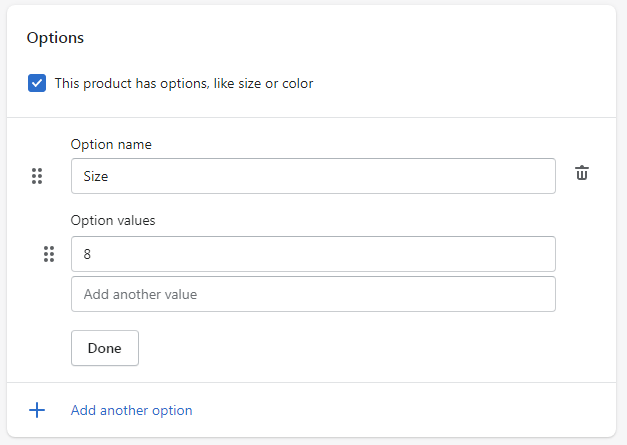
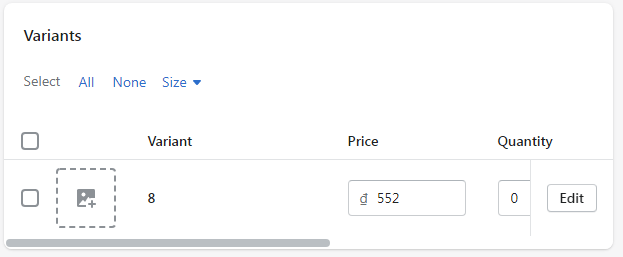
If your item has many options (e.g. color, size, material & style) you may add variation in this section. Give the option a name and type the option values and separate them by a comma. Just as before, you’ll have to input the inventory for each variant.
Search engine listing preview
This is a sneak peek at how the product will appear in search results. The text by default is a duplicate of the title and description you already typed. If you want to make adjustments to the preview, click “Edit website SEO”. This allows you to differentiate what search engines see from what your customers view.

Product status
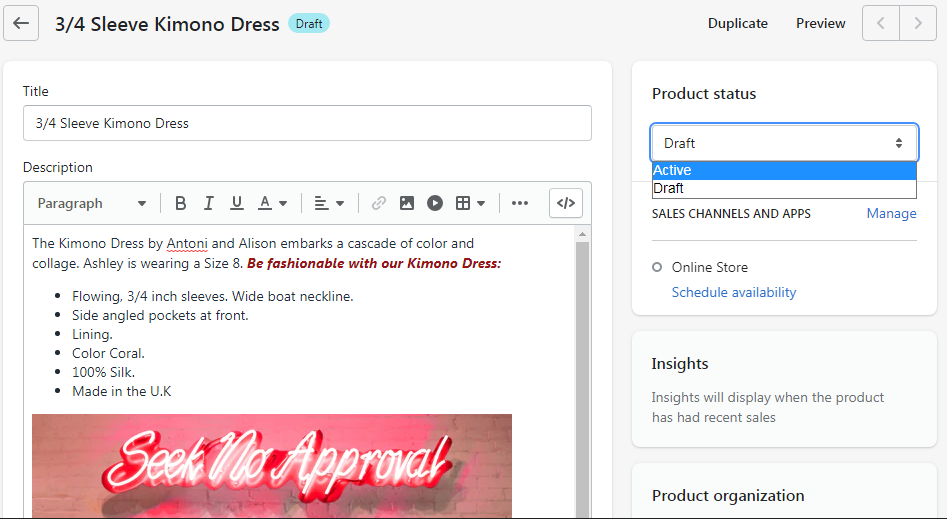
You need to change the status to Active so that the product can be available on all sales channels. If you only sell on Shopify, then the online store is your only sales channel.
Product organization
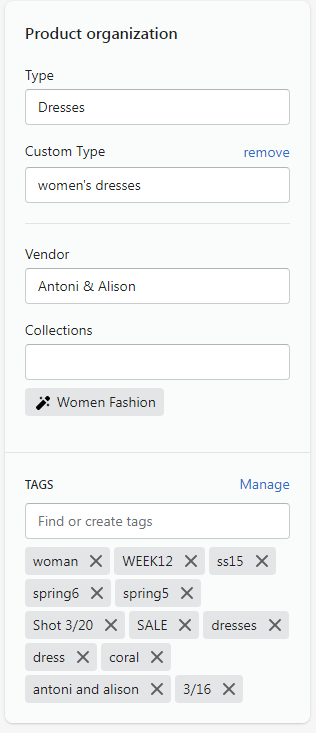
You’ll need a better method to handle items in bulk and organize them as your product inventory expands. This will assist you in staying organized as well as assisting your clients in navigating your online shop. You should try to add as many details as possible such as product type, custom type, vendor, collections, and tags.
Preview and Save
Once you have finished creating the product, click Preview to see how the product is shown on your online store. If you’re satisfied with the result, click Save. You can change the product settings at any time.
How to add products to collections in Shopify
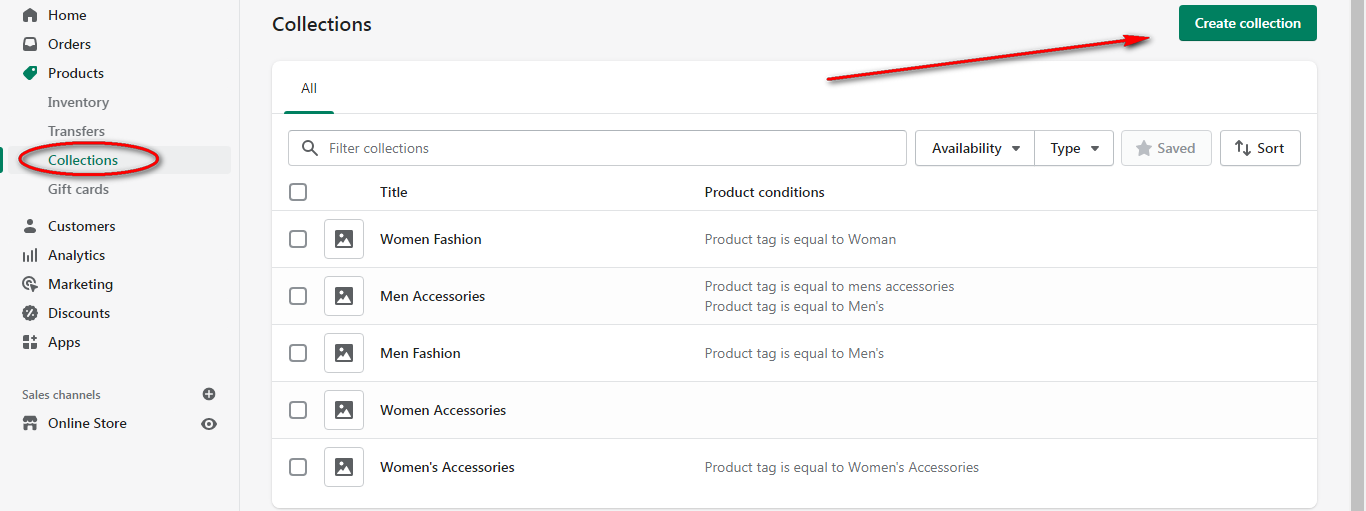
The collection helps you keep products more organized. You are allowed to add one product to many collections. This is advantageous since it keeps your shop structured and provides a pleasant browsing experience for your visitors. Under the Products, select Collection and click Create collection.
The title and description
When you name the collection, go for clarity over cleverness. For the description, follow the same method as the product description. A few collection examples you can create are items for women, men, and kids; sale or best-selling items; items of a specific material or color; special event or holiday items, etc. There are two collection types: manual and automatic.
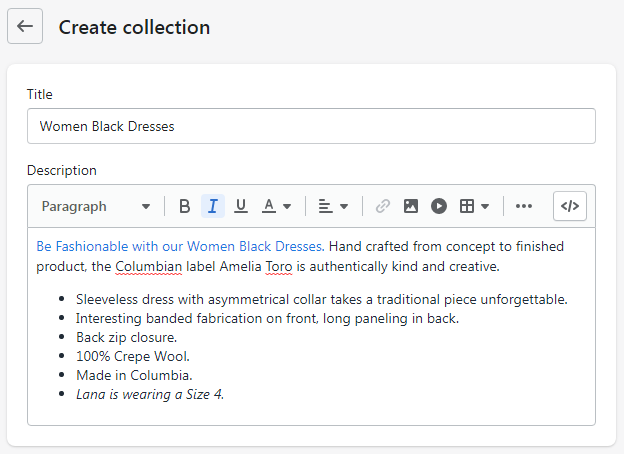
Manual collection
The manual collection contains products chosen separately by you. It takes more work to create a manual collection. However, if you wish to curate a small or special collection, a manual collection is a good choice.
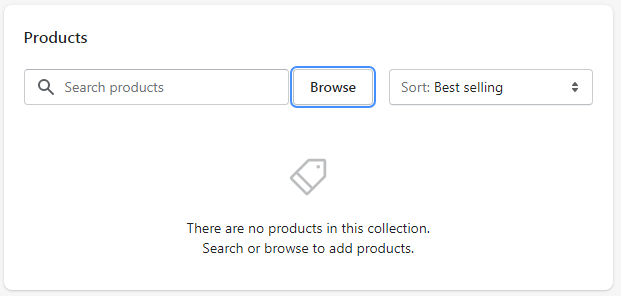
Automated collection
For an automated collection, you just need to set conditions. Existing or future products meeting the conditions will be automatically added to the collection. This is perfect for companies with a huge product inventory.
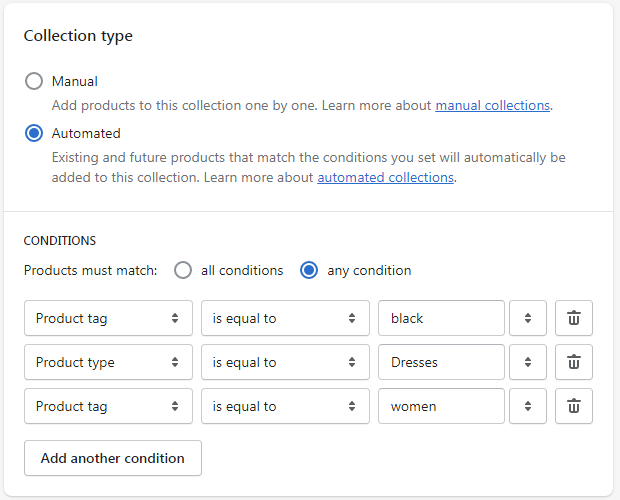
There are a total of 60 selection conditions that you may use, including product title, type, vendor, price, weight, inventory stock, etc. You can also indicate whether items must fulfill all or some conditions in order to be considered for inclusion in the collection.
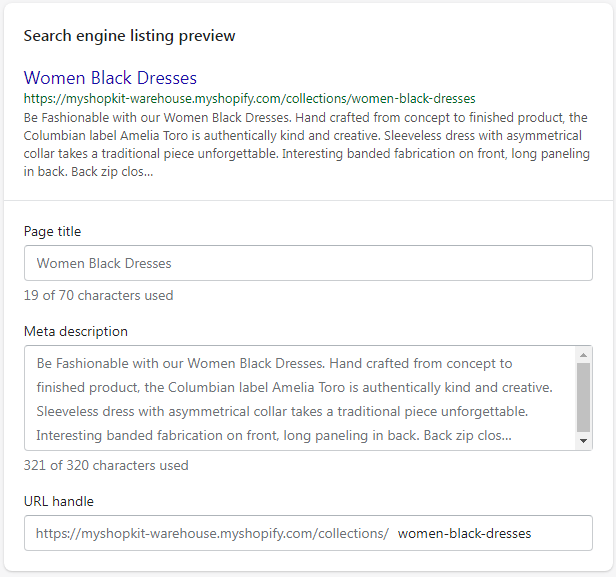
Search engine listing preview
Just like the product, it will copy and paste the collection title and description by default. You are allowed to edit this preview if you wish. Shopify also recommends a character limit for each section.
Collection image
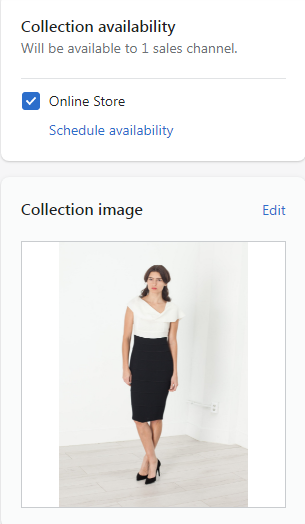
On the right side below collection availability, you can add a collection image to represent the collection’s contents. If you don’t add an image, the image of the first product in the collection will be shown. After finishing all settings, don’t forget to click Save. You can also sort the collection’s order manually or automatically based on price, product title, best selling, etc.
How to set up payment to get paid
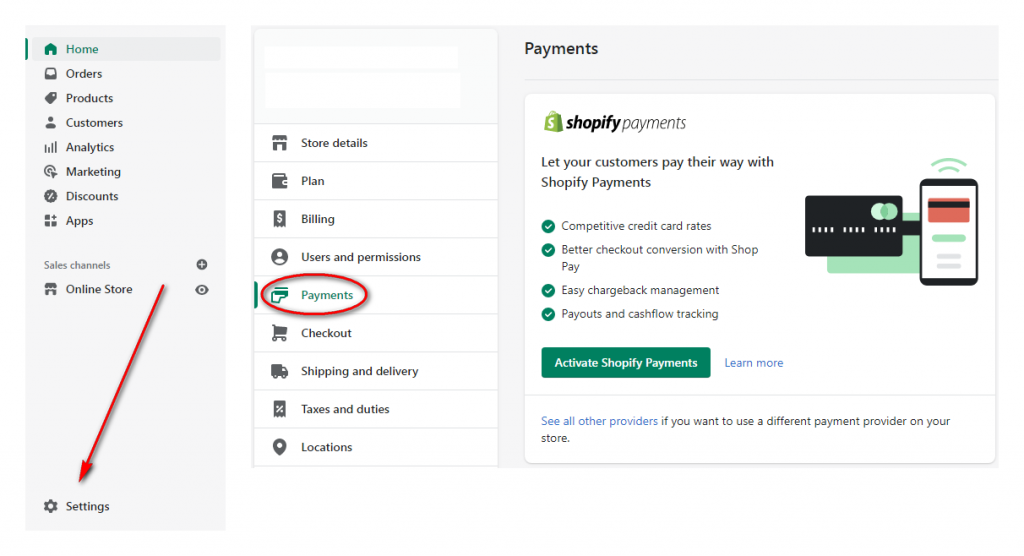
It’s a tremendous accomplishment to earn your first sale. At this stage, you knew how to set up Shopify store to generate sales. However, before that, you must set up payment processing with a payment provider. Choose “Settings” at the bottom of the admin menu, and select “Payments”. Customers can pay for their orders using any of the options you’ve authorized there.
Shopify Payments
If your store location belongs to supported countries/regions of Shopify Payments, you’ll find the option “Activate Shopify Payments”. If not, you can’t find that option and have to choose other third-party payment providers.
Other payment providers
Shopify Payments is also not exclusive, so you can also accept PayPal or other payment methods. This provides your buyers with more alternatives for how to pay for their products, increasing the possibility of buying. It helps to develop confidence and increase conversions when a consumer can pay through a method they’re comfortable with.
In case you wish to accept credit cards, you may pick from more than 100 providers with varied additional transaction fees. Plus, you can allow manual payment options to assist customers in placing an order without using credit cards. You also have the option of capturing the credit card details and charging later.
Complete the account setup
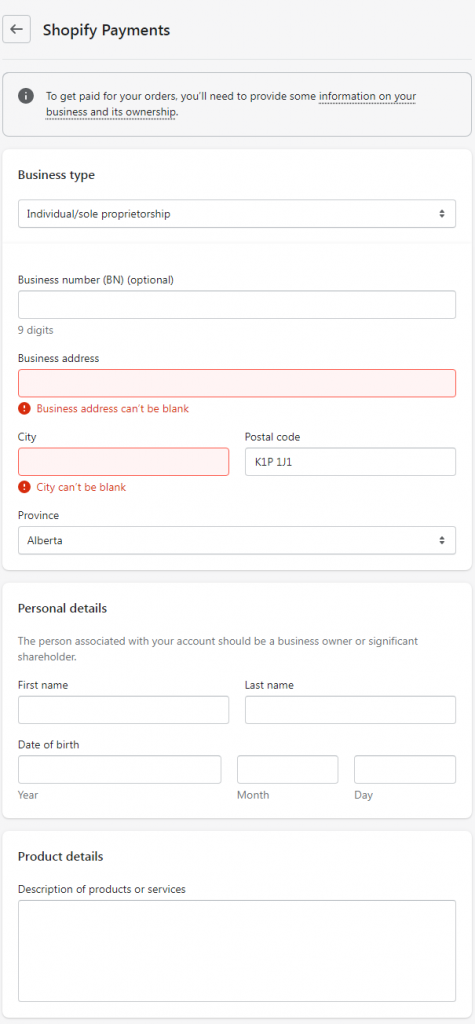
To get payouts, you are required to complete the account setup. Fill up the blanks with information about your company and personal information. Give a quick overview of your product/service. You may edit how your buyers’ purchases appear on their bank statements by changing the customer billing statement. Make sure your brand is prominently displayed in the description so that the buyer can easily identify the purchase when reviewing their bills.
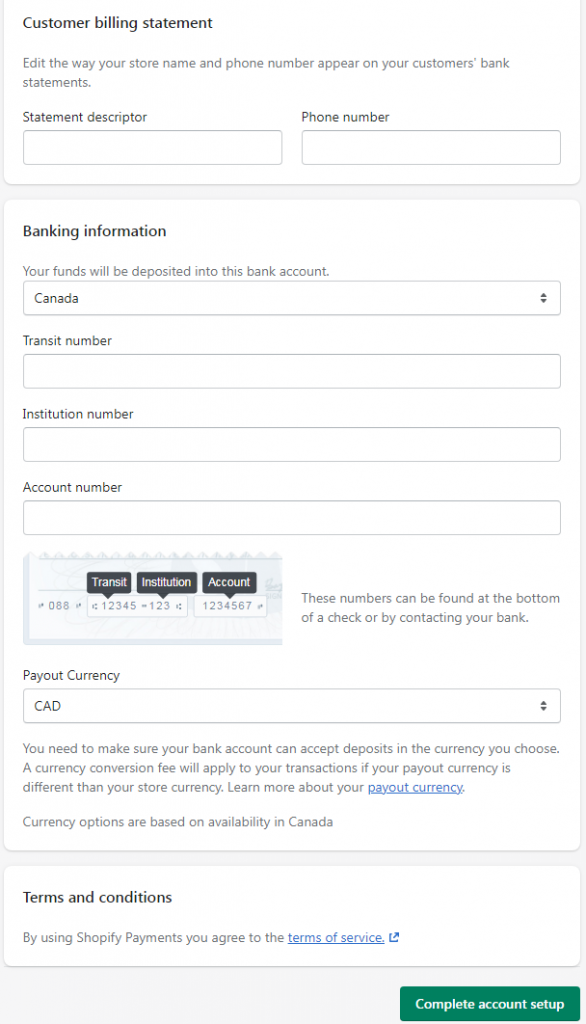
Fill in the blanks with your financial details. You should establish a business bank account to keep your business account distinct from your personal one, making it easier to control your business finances.
How to buy your domain
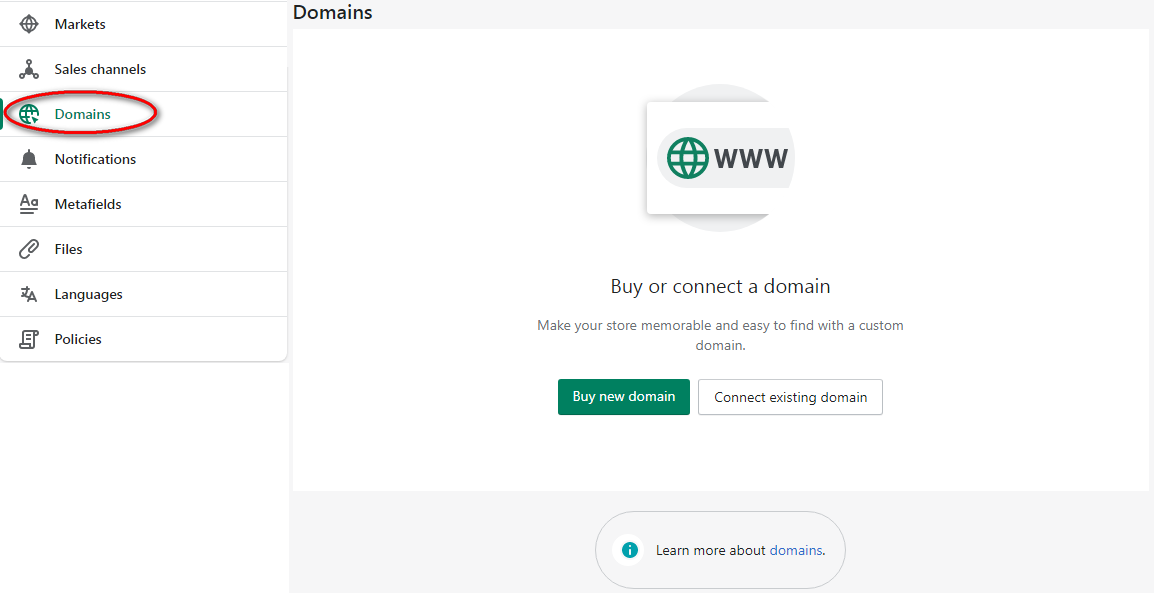
Getting a domain is an essential step in building your brand and gaining customer trust. You can purchase a custom domain right from your Shopify dashboard, making it simple to administer and renew. Click on “Settings”, select “Domains” and choose the button “Buy new domain”.
Fill in the domain name you’d like to purchase. Ideally, you should get a.com name or a domain extension that represents the nation in which you conduct business, such as.ca or .uk. Com is a well-known extension across the world.
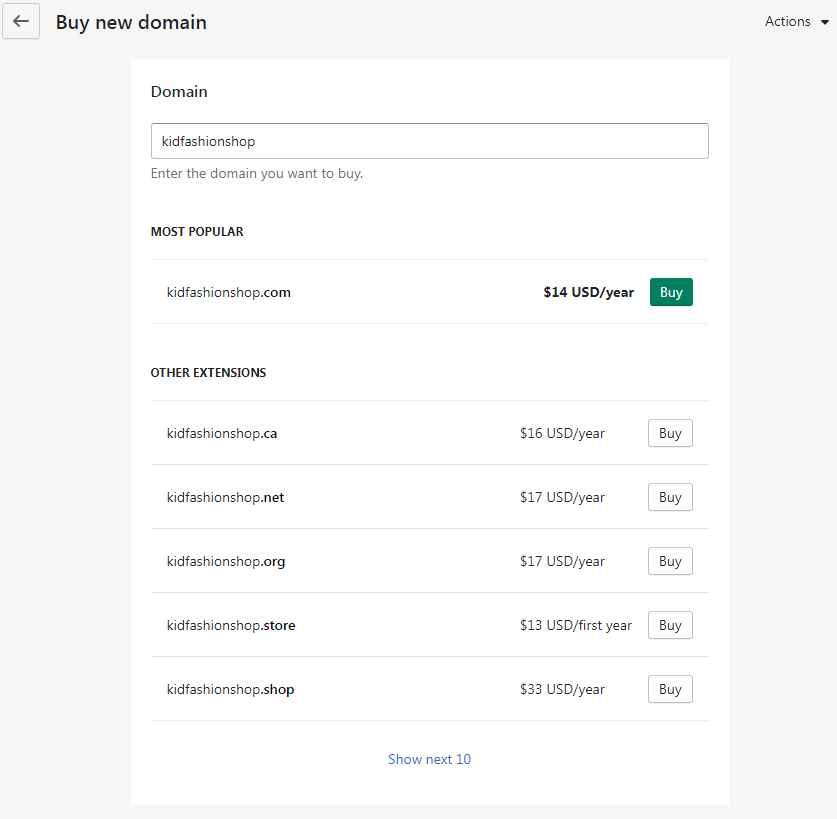
If your preferred domain isn’t accessible, Shopify can help suggest other alternatives. Domains bought via Shopify are automatically registered for 1 year and can be continued until you don’t use it or your Shopify business is closed. When you select your domain, you’ll be asked to provide your payment card information.
Note: You can also connect your existing domain if you have one.
How to add a page on Shopify
Besides Product Pages, four important pages that help convey trust to your customers are “About us”, “Contact”, “Frequently Asked Questions”, and “Blog posts”.
Information pages
It is reassuring for customers to know that there is a genuine person behind the company and to whom they can reach out. On the FAQ page, you may assist customers with frequent product-related questions and, hopefully, save time on customer service requests. Shopify makes it simple to add a new page without coding knowledge.
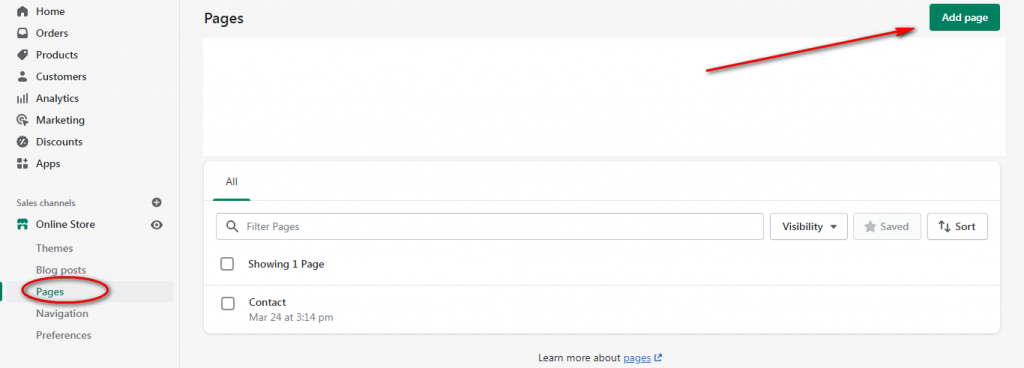
Under “Online Store”, choose “Pages” and click “Add page”. Add the title and description of the page.
Blog posts
Just above the “Pages” section, click “Blog posts” and “Create blog post”. There, you can make blog articles. It has a similar appearance to the page builder, but it allows you to add some extra things such as a featured image or an excerpt.
There are two primary motivations for starting a blog:
- The first is to strengthen your brand by engaging in “thought leadership” activities.
The bottom line is that you should write about topics popular among your target audience. When they read your blog and enjoy their experience, your brand gains their trust over time.
- The second reason is for search engines.
When someone looked up “how is [your product] made?” on Google, you could appear in search results as you wrote an excellent blog article on the subject. This visitor may not have intended to purchase your product. But they came to your blog and they may begin exploring your online store.
How to create a navigation menu
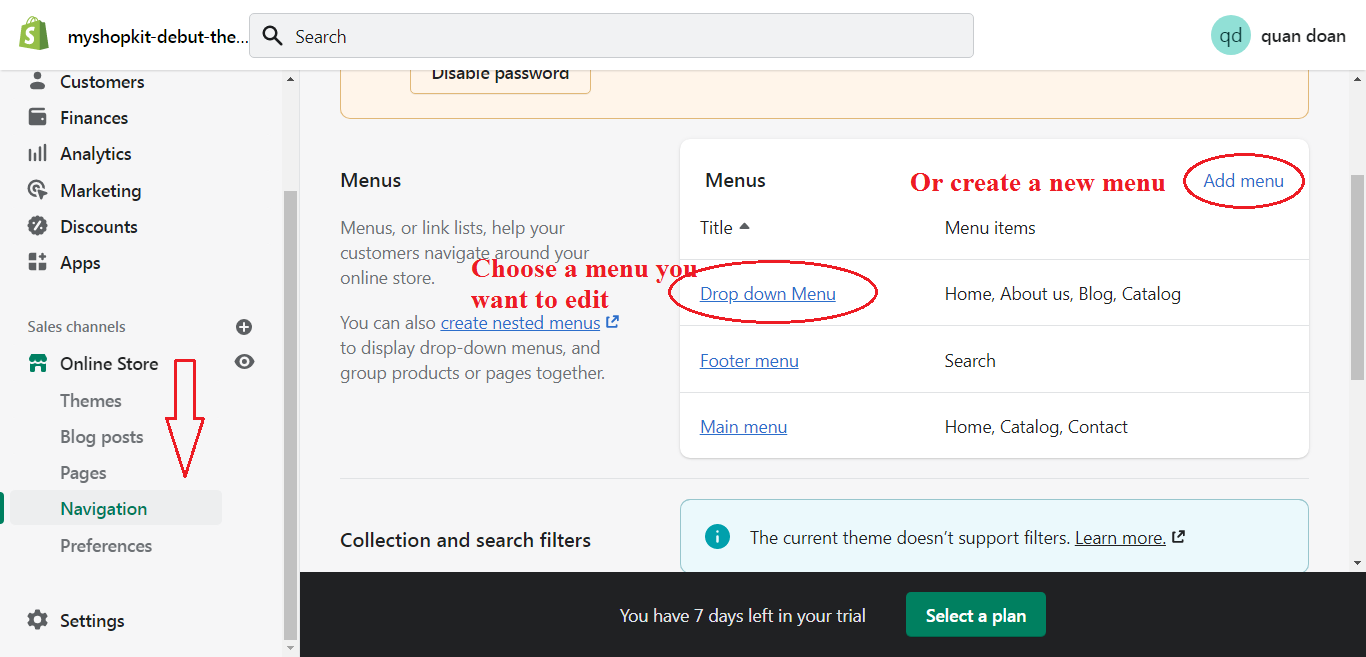
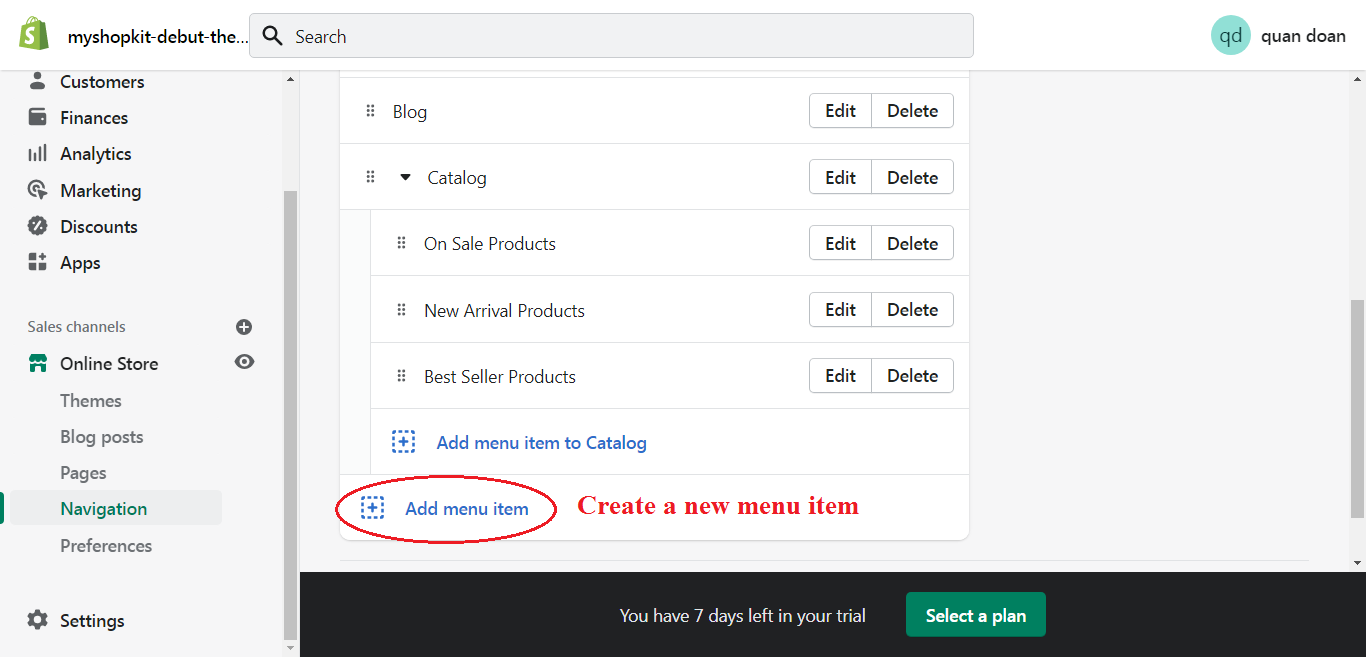
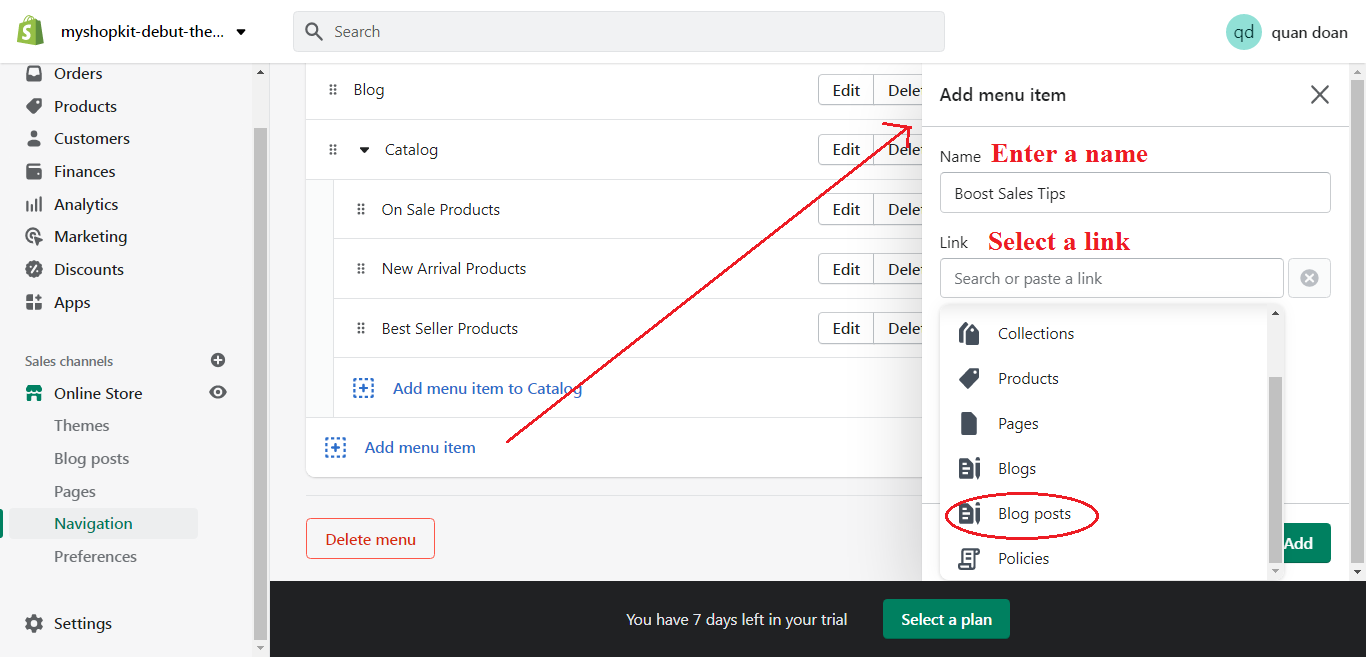
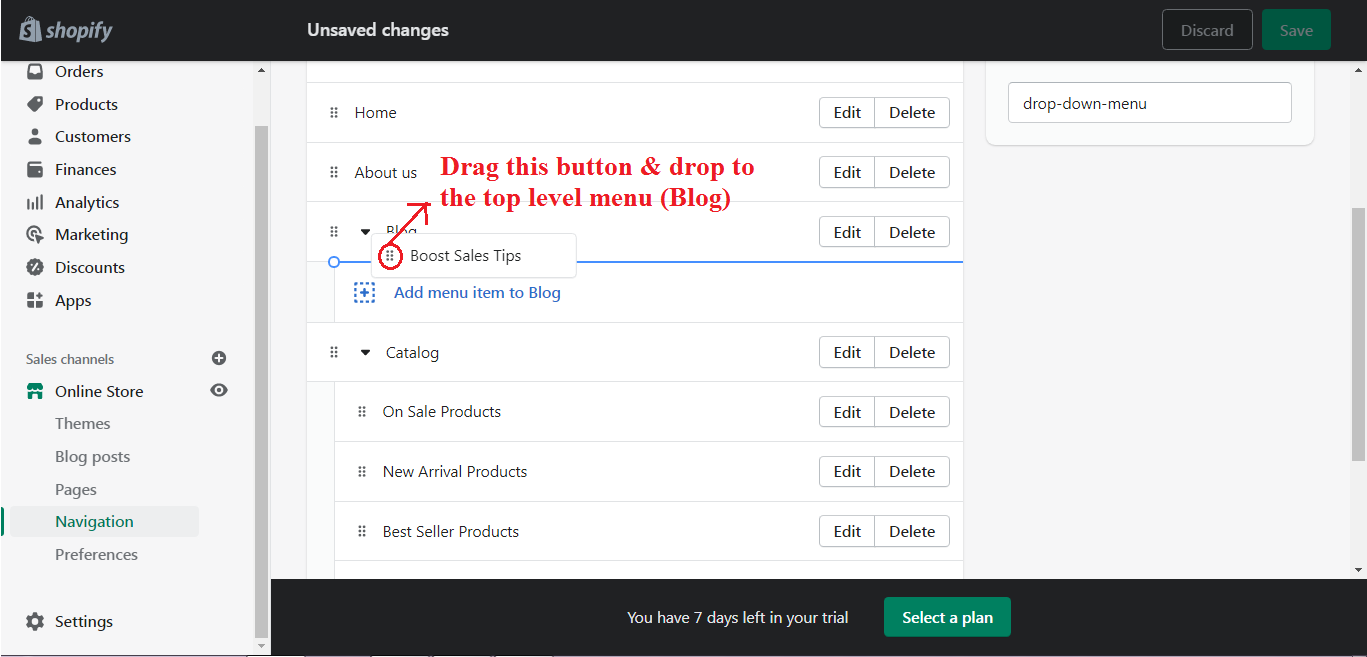
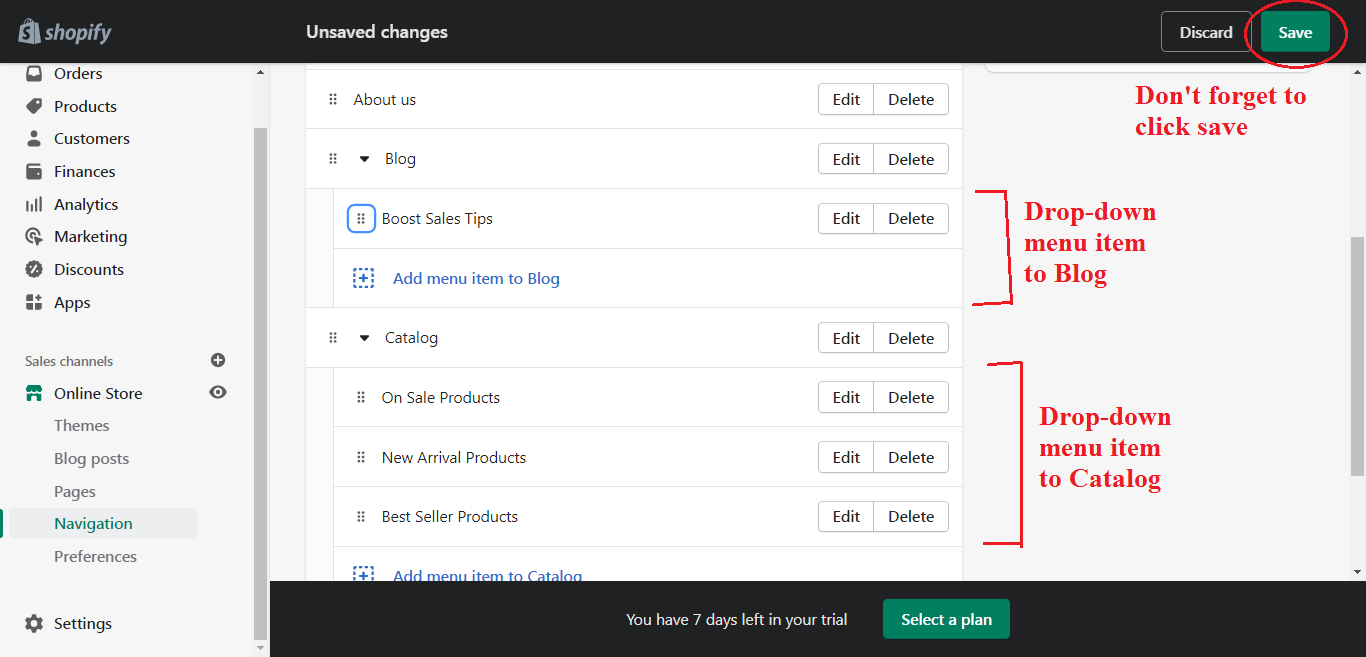
Adding a navigation menu to your shop makes it easier for visitors to identify what they’re searching for. You are encouraged to add Home, Catalog, Contact us, and About us. If you add more than this, your store will get cluttered, and navigating will become difficult. The main menu and the footer are the two types of default menus in Shopify.
Shopify also supports a drop-down menu. Under Online Store, select Navigation, and choose the menu you want to edit. Create a new menu item and drag-drop the item underneath the top-level menu.
How to choose your theme
If you’ve never developed a website before, no worries. Shopify themes can give you a hand in designing the look and feel of your storefront. In the Shopify theme store, you can choose from over 100 free and paid premium themes. You can either follow the above link to explore themes or do so in your Shopify dashboard.
In case you come across an fascinating theme and want to find which theme it is, you can use your FREE Shopify theme & app detector.
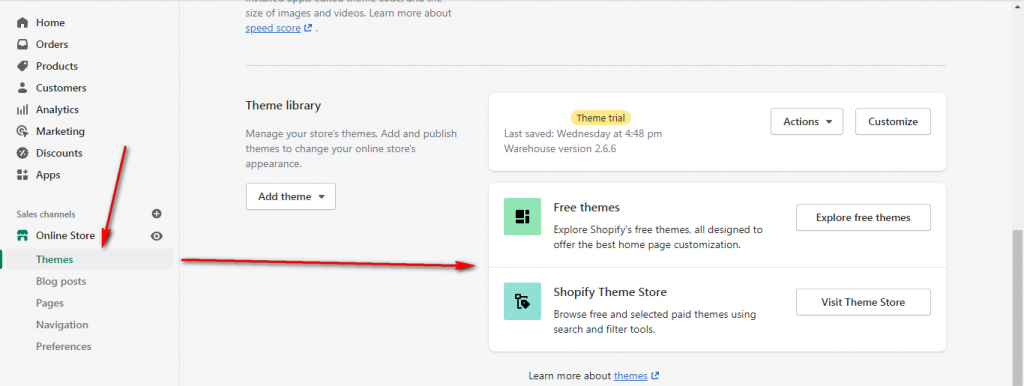
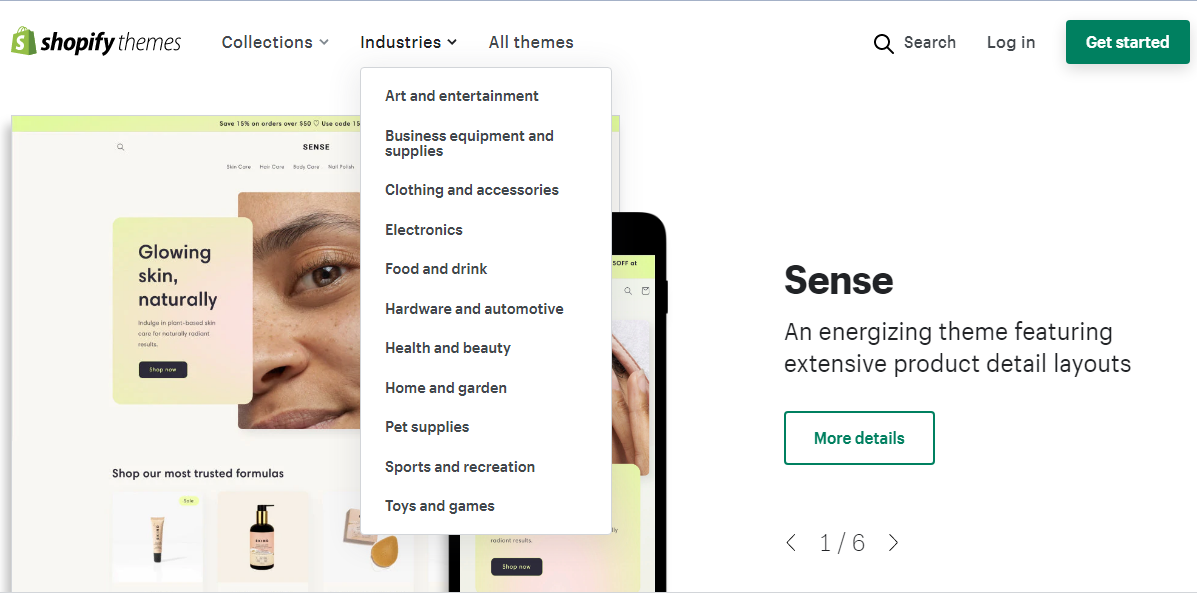
To choose the ideal theme for your store, use search & filtering features. To begin, you may filter your search by collections and industries. Then, you can narrow down your choice based on price, theme architecture, catalog size, layout, and design.
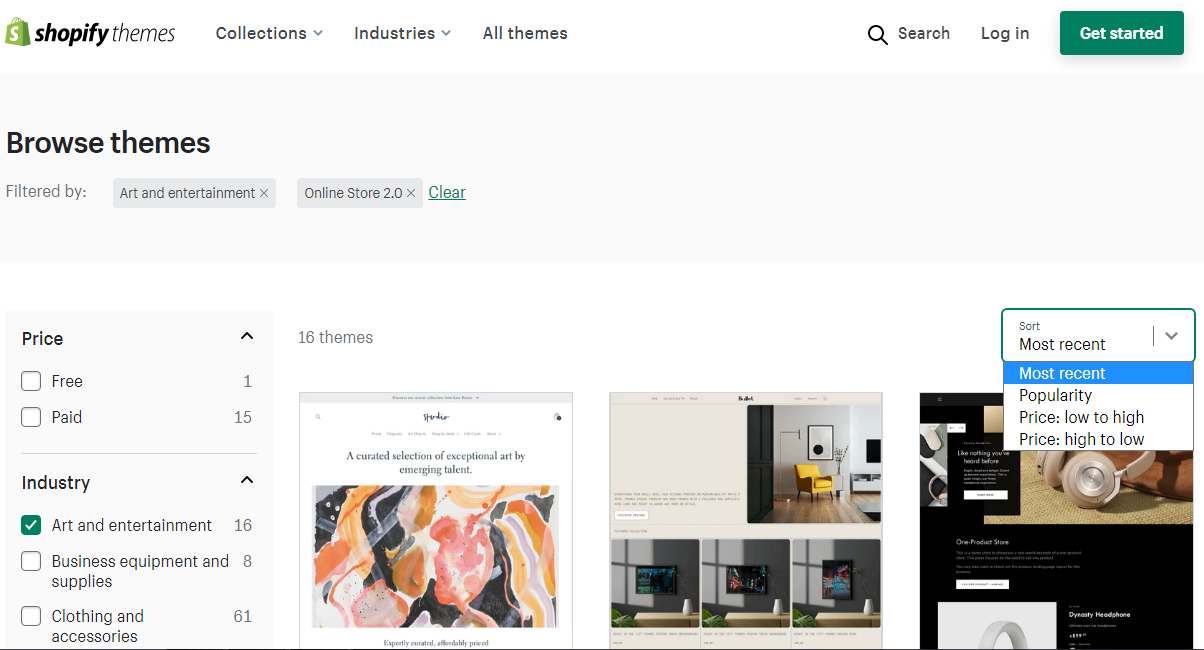
Click on the theme to see its landing page on Shopify. There, you are expected to see features, reviews, support & documentation, and recommended apps of the theme.
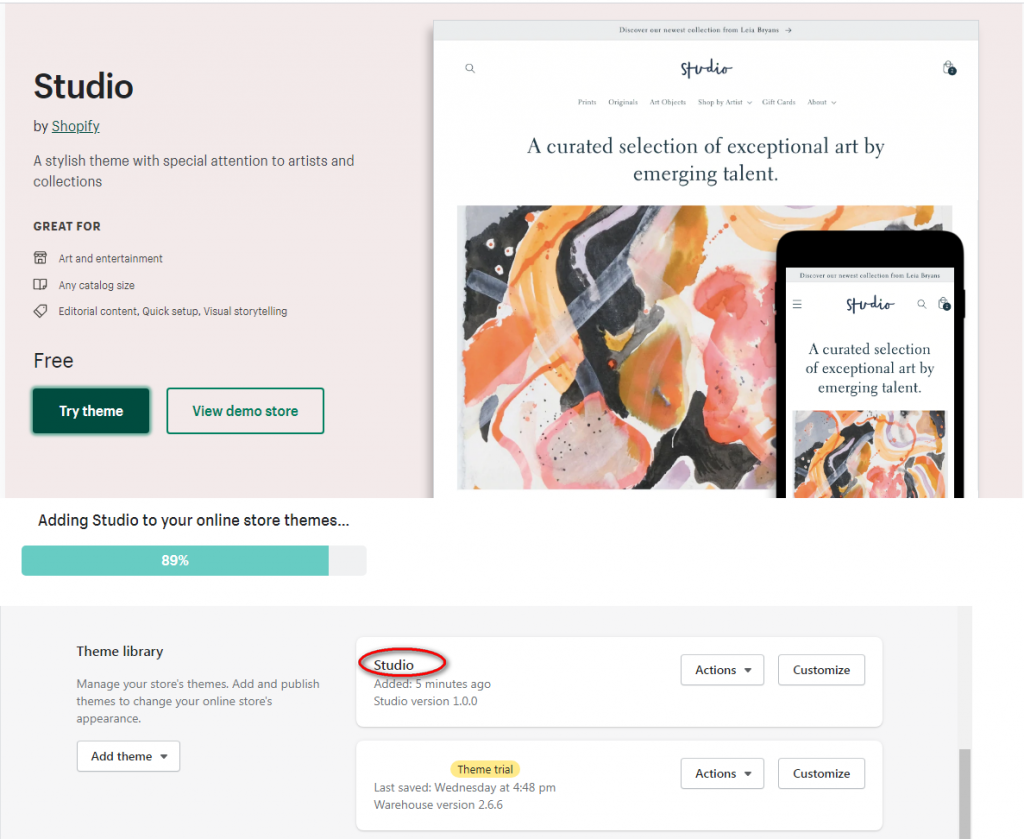
Take Studio theme for an example, click Try theme and enter your Shopify store URL if you haven’t logged in. Wait for a few minutes, you will find Studio in your theme library. Click “Customize” to personalize your theme.
How to customize your Shopify store
We’ll customize a free Debut theme. To open the store builder, click “Customize.” I recommend beginning at the top and working your way down so to avoid missing anything.
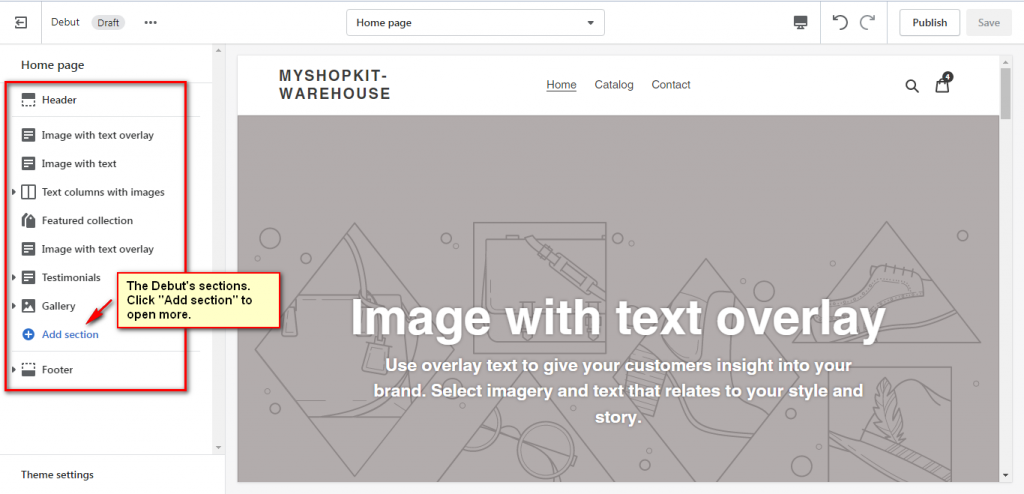
After you’ve finished editing, remember to click Save in the top right corner. You may lose your edits if you go to another page without saving them. Each section’s sequence and availability may change depending on the theme.
At the top middle of the builder is the page selector where you’ll choose which page you want to customize. On the right is the desktop icon, referring to the device you use to see what your store looks like. On the left are a three dots icon that has support material & a preview and the store status.
Click on any section you wish to edit. Don’t forget to click Save and Publish your store so that customers can see it. If you want to dig deep into each section, you can read the Debut theme review.
Below is the demo store built by Debut. Have a look at it.
In the Theme settings section, you can change the style based on colors, typography, checkout, search, etc. as well as App embeds.
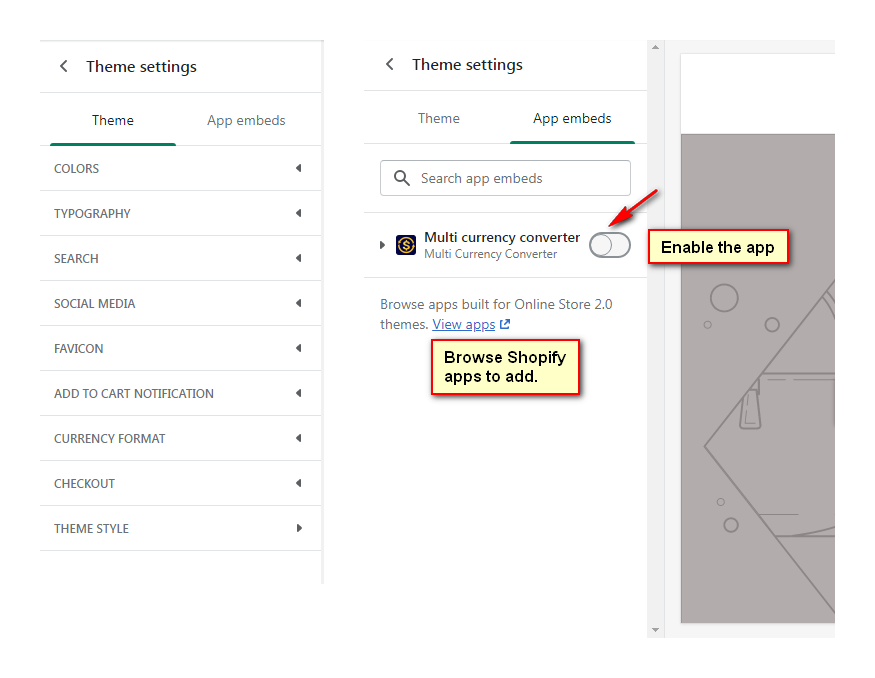
In case you encounter any problems, you can contact Shopify support if you use a Shopify theme. But, if you use a Shopify partner-developed theme, you should contact them directly.
If you want more exceptional features on your e-commerce site or want expert assistance, you can hire a Shopify expert from the Toptal marketplace, top companies, and start-ups choose Toptal Shopify freelancers for their mission-critical software projects.
How to edit Preferences
The title and meta description for your shop will be written in this section. It’s also where you’ll set up Google Analytics & Facebook pixel, spam protection, customer privacy as well as launch your business.
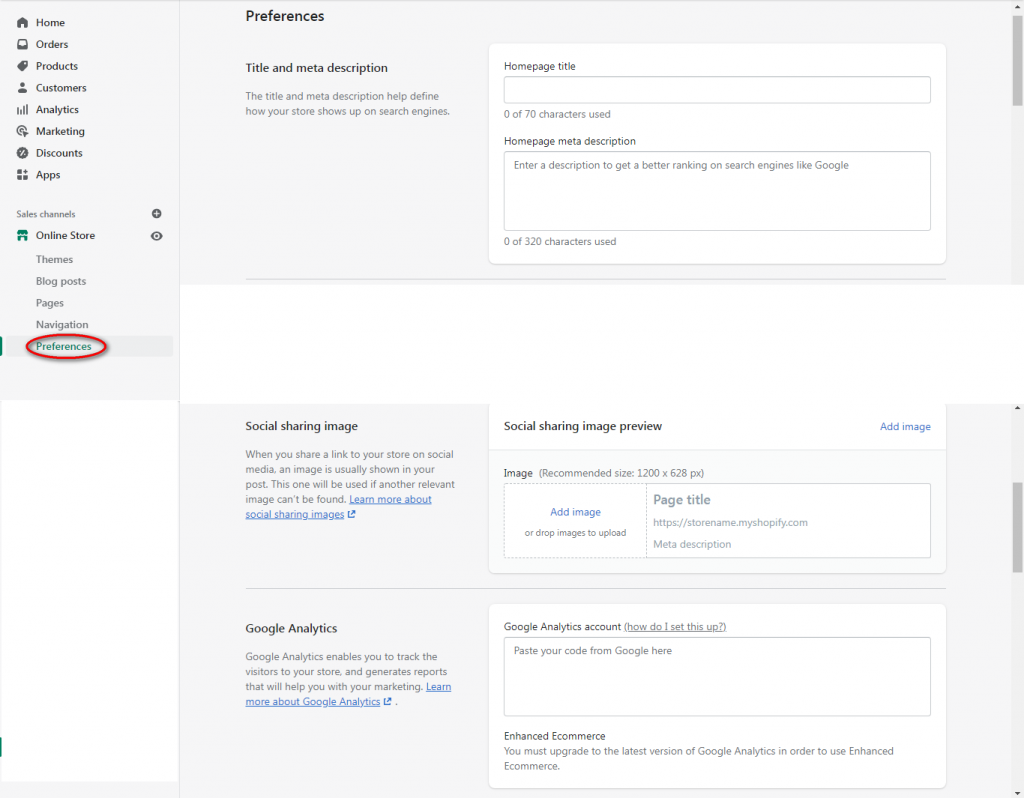
How to add a meta tag to Shopify
Let’s begin by providing a title and a meta description. To get found by search engines, you’ll need to include relevant text and keywords. The title and meta description will appear when a shopper puts different keywords into a search engine to discover the product they’re looking for.
Social sharing image
When you post a link to your store on social media, it normally includes an image. If no other related image can be identified, this one will be used.
Add Google Analytics to Shopify
Google Analytics allows you to monitor your store’s traffic and provide information that can assist you in marketing your company. It’s not required, but it’s free and a useful tool. I utilize Google Analytics data on a daily basis to develop our website and brainstorm new content ideas. To set up Google Analytics, you’ll need a Google account. You just need to copy and paste the code provide by Google Analytics.
How to add Facebook pixel to Shopify
You may also add a Facebook pixel here if you’re intending to advertise on Facebook. A Facebook pixel is a piece of code that allows you to track both incoming traffic and buyer activity. That data can help you enhance your Facebook marketing. To add your Facebook pixel, you’ll need a Facebook business page. To receive detailed guidelines, click “how do I set this up.”
Password protection
By establishing a password page, you may limit buyer access to your store. Since you’re still configuring your Shopify store and adding items, this is the default. When a buyer visits your site, they will see that it is locked and that they will be unable to access anything.
Some themes enable you to capture email addresses and begin funneling social media traffic to various channels. It’s a fantastic approach to growing your following before you launch your brand. You can also offer individuals access to the store before it goes live so they can review it and buy things. Your password page is active till you pick a plan if you’re still on a trial version.
How to change shipping price on Shopify
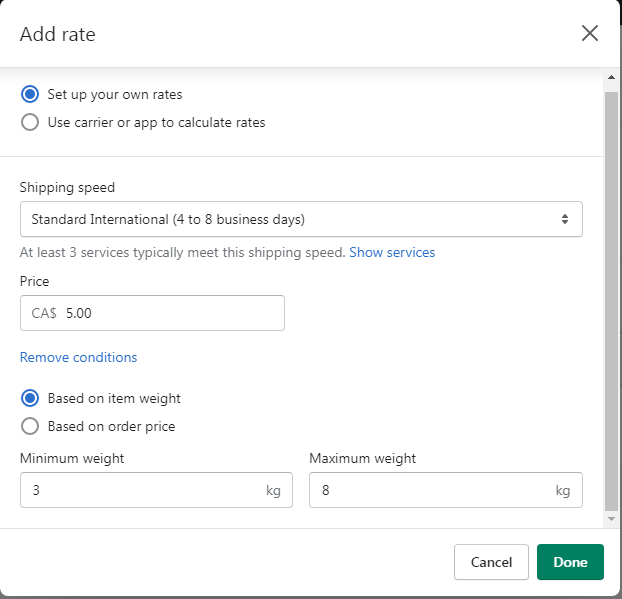
To change shipping price, go to Settings > choose Shipping and delivery > then click Manage rates.
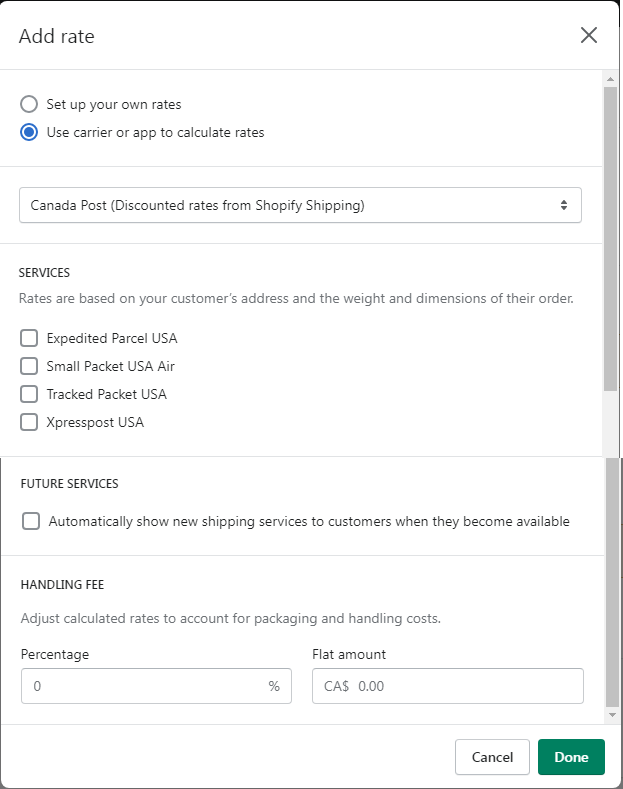
If your store’s location is in Canada or the US, your country will display as a domestic zone by default, and Shopify shipping will be activated. If you’re not in North America, your default rates will be weight-based.
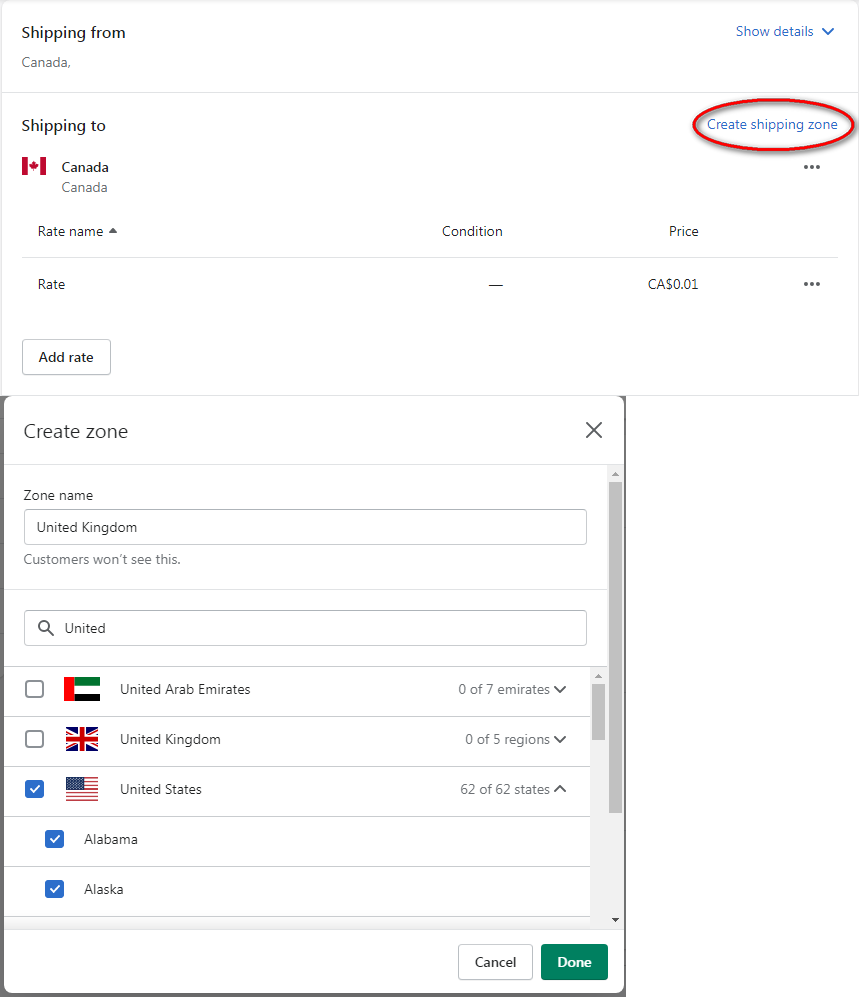
First, create a new shipping zone and select the countries/regions where you will deliver the products. Second, click Add rate. You can create your own rate based on products’ weight or price and use an app to calculate the price.
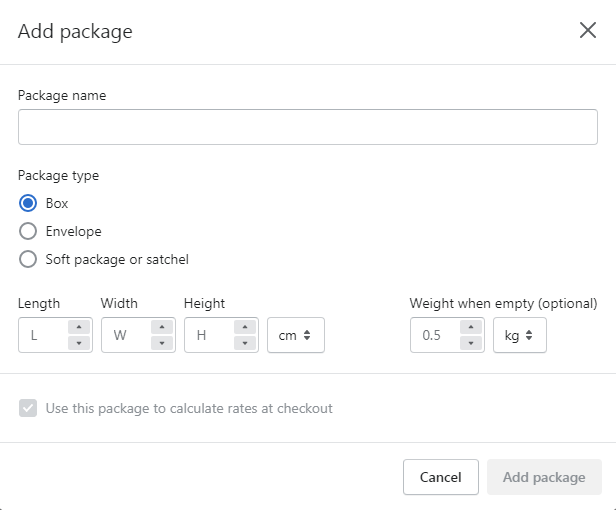
Don’t forget to add packages. You should establish a branded package experience to leave a long-lasting impression on your customers. You can add customized tissue paper, stickers, tape, discounts for future buys, a thank-you note, and promotional items besides the box you ship in.
How to add Shopify apps
Apps are used by more than 80% of Shopify merchants to manage and expand their business. Why would you want to use an app? Shopify offers you all the essential features that enable you to launch and expand your business. You may require unique functionality not currently accessible on Shopify for your business.
Thousands of applications produced by Shopify and Shopify partners improving the functionality of your store may be found in the Shopify app store. Begin by asking yourself a few questions before selecting an app for your shop.
- What more does my store need in addition to Shopify’s basic features?
- What will make it easier for me to run my store?
- What might I do to boost my sales?
- What is the maximum amount of money I can spend on apps?
Apps can be free or charged, based on the app developer’s pricing policy. Paid applications charge a monthly cost, a one-time price, or a fee for each usage. Most premium applications also come with a free basic plan or a free trial, allowing you to test the app before purchasing it.
Before you choose an app, read the description and take note of how you may receive help if you have any problems. After choosing “Add app,” you must authorize the app by clicking “Install app.” After you’ve installed your applications, go to your Shopify store’s app area to see them all. Don’t forget to enable an app on your current theme.
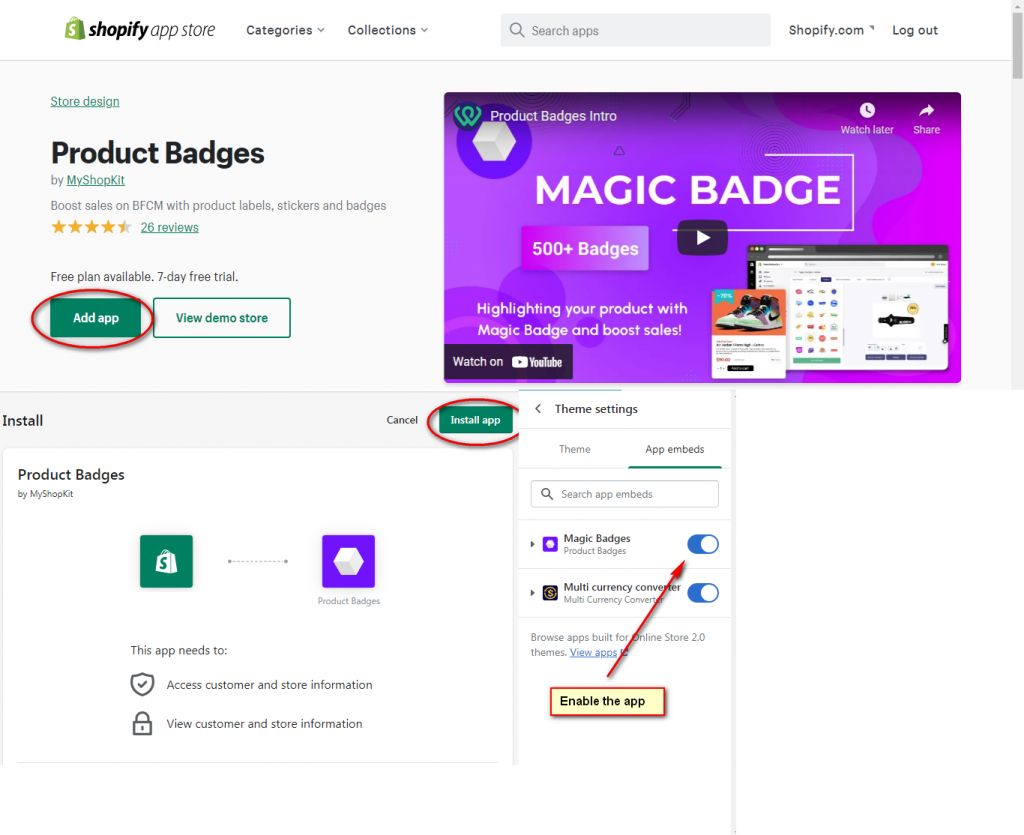
Top free Shopify apps helping boost sales
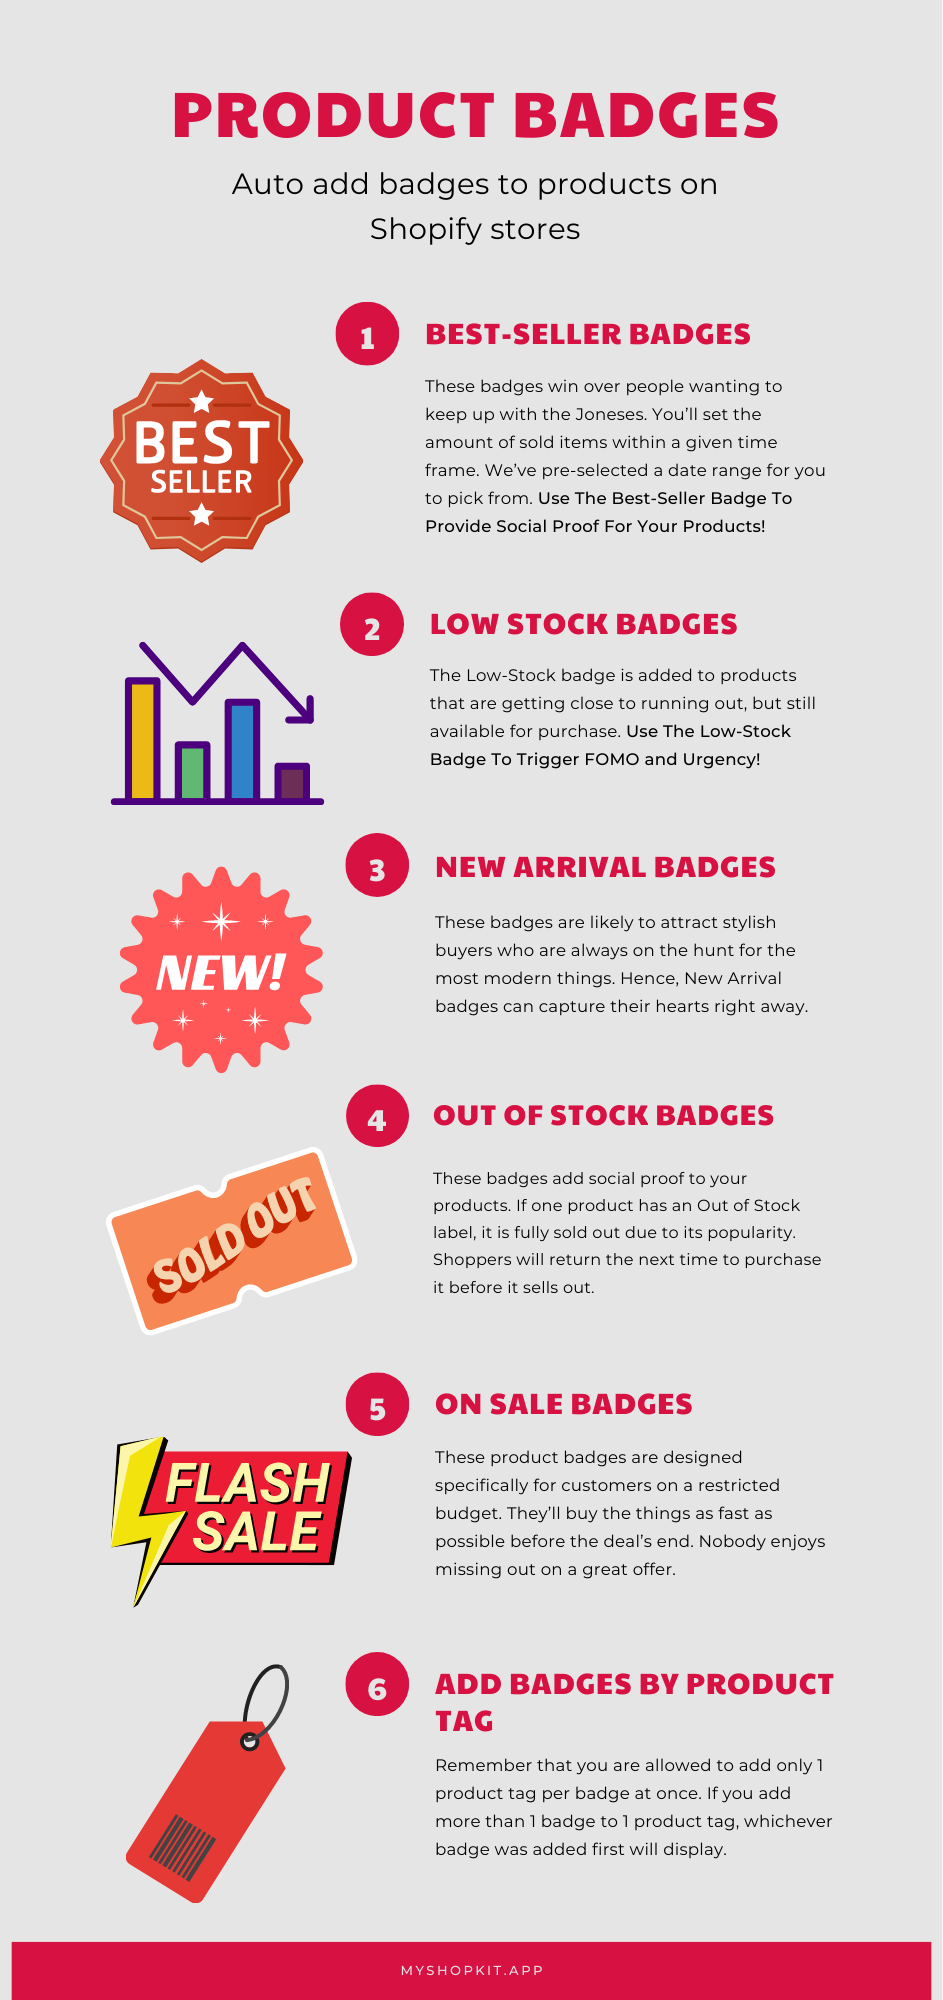
Shopify upsell app: Product Badges
Add badges such as On Sale, New Arrival, Best-Seller will undoubtedly urge customers to make a purchase. These badges attract the right types of customers and help them buy the most suitable products.
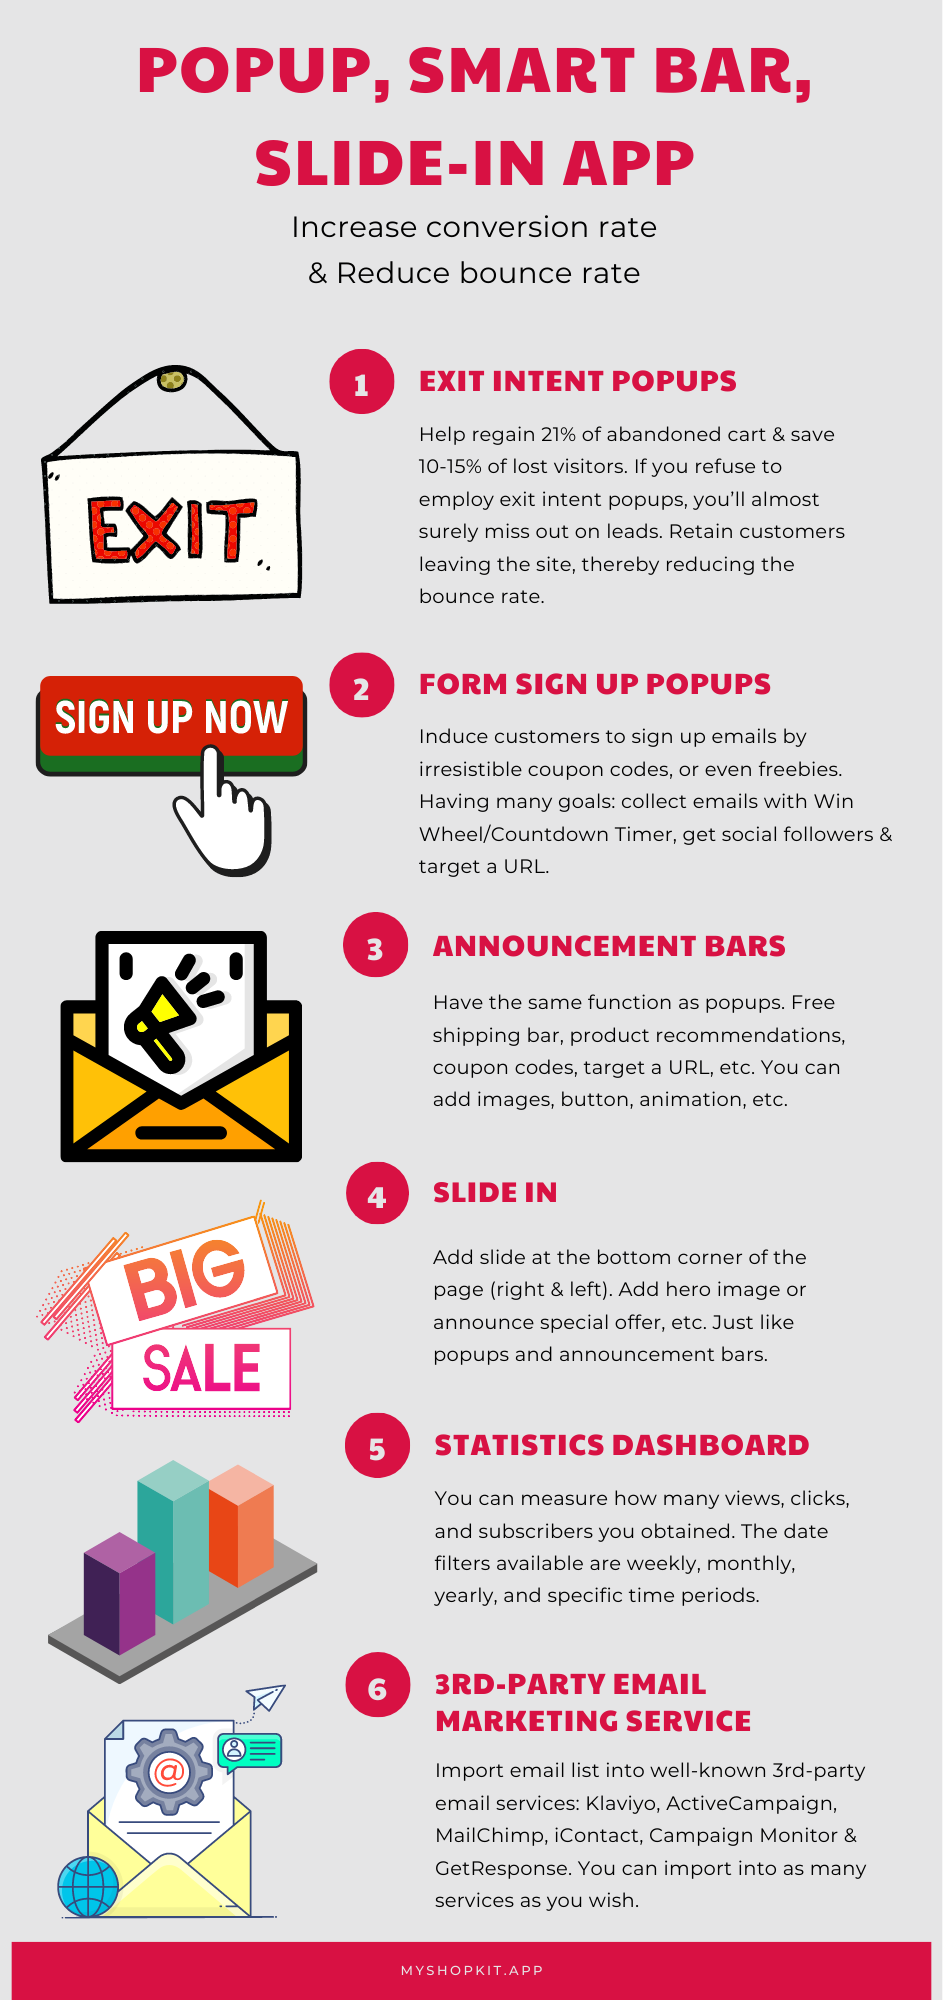
Shopify email app: Popup, Announcement bar, Slide
Do you wish to collect email without violating customer data privacy? This app is a real solution. It creates attractive email sign-up popups that persuade visitors to leave their emails by choice. For the announcement bar, you can announce a free shipping policy. Slides can help highlight any product you want to increase sales.
Shopify website builder: Veda Builder
This app offers a number of attractive pre-built Shopify pages. Veda Builder is quite useful for adorning your business with symbols, emojis, graphics, videos, animation effects, and more! This app claims to be able to create a one-of-a-kind eCommerce store. You could want to let Veda create a completely new shop or change the pages of any theme.
Multi-currency Converter
Greeting your international customers by their domestic prices as soon as they land on your website will create a pleasant shopping experience. This helps them feel more connected to your brand and make a buy at ease.
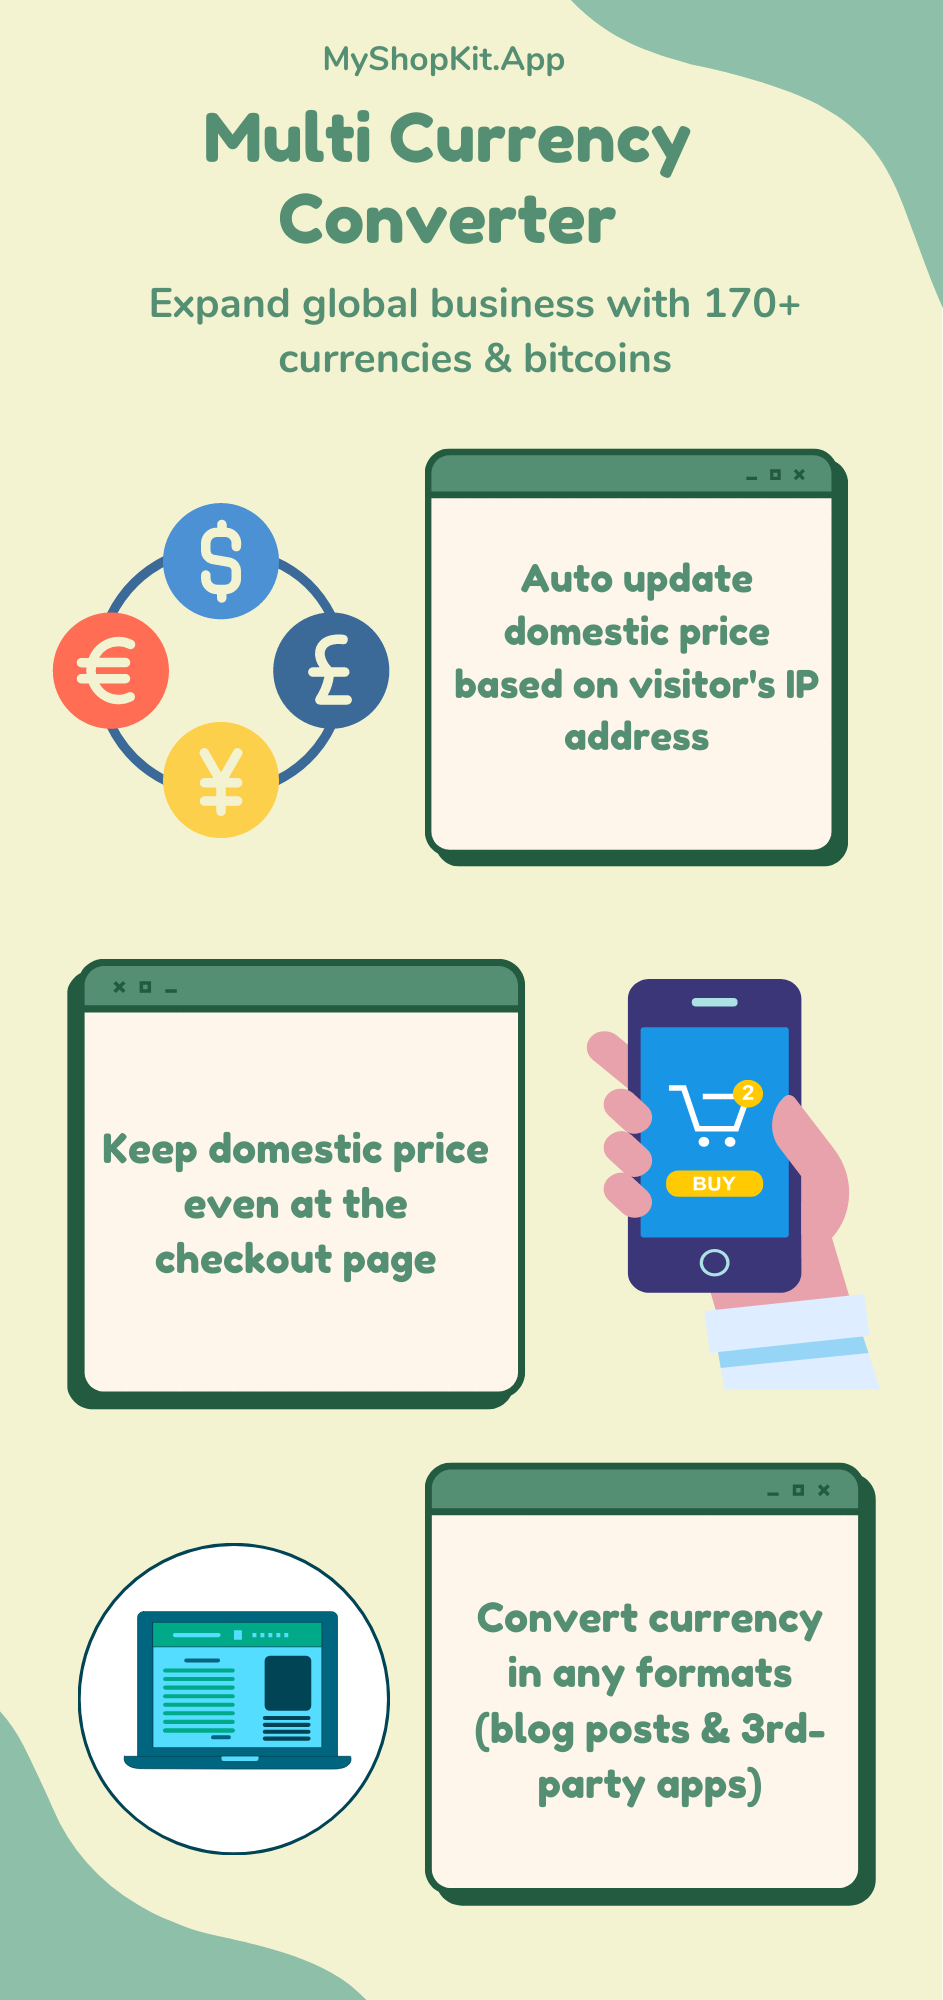
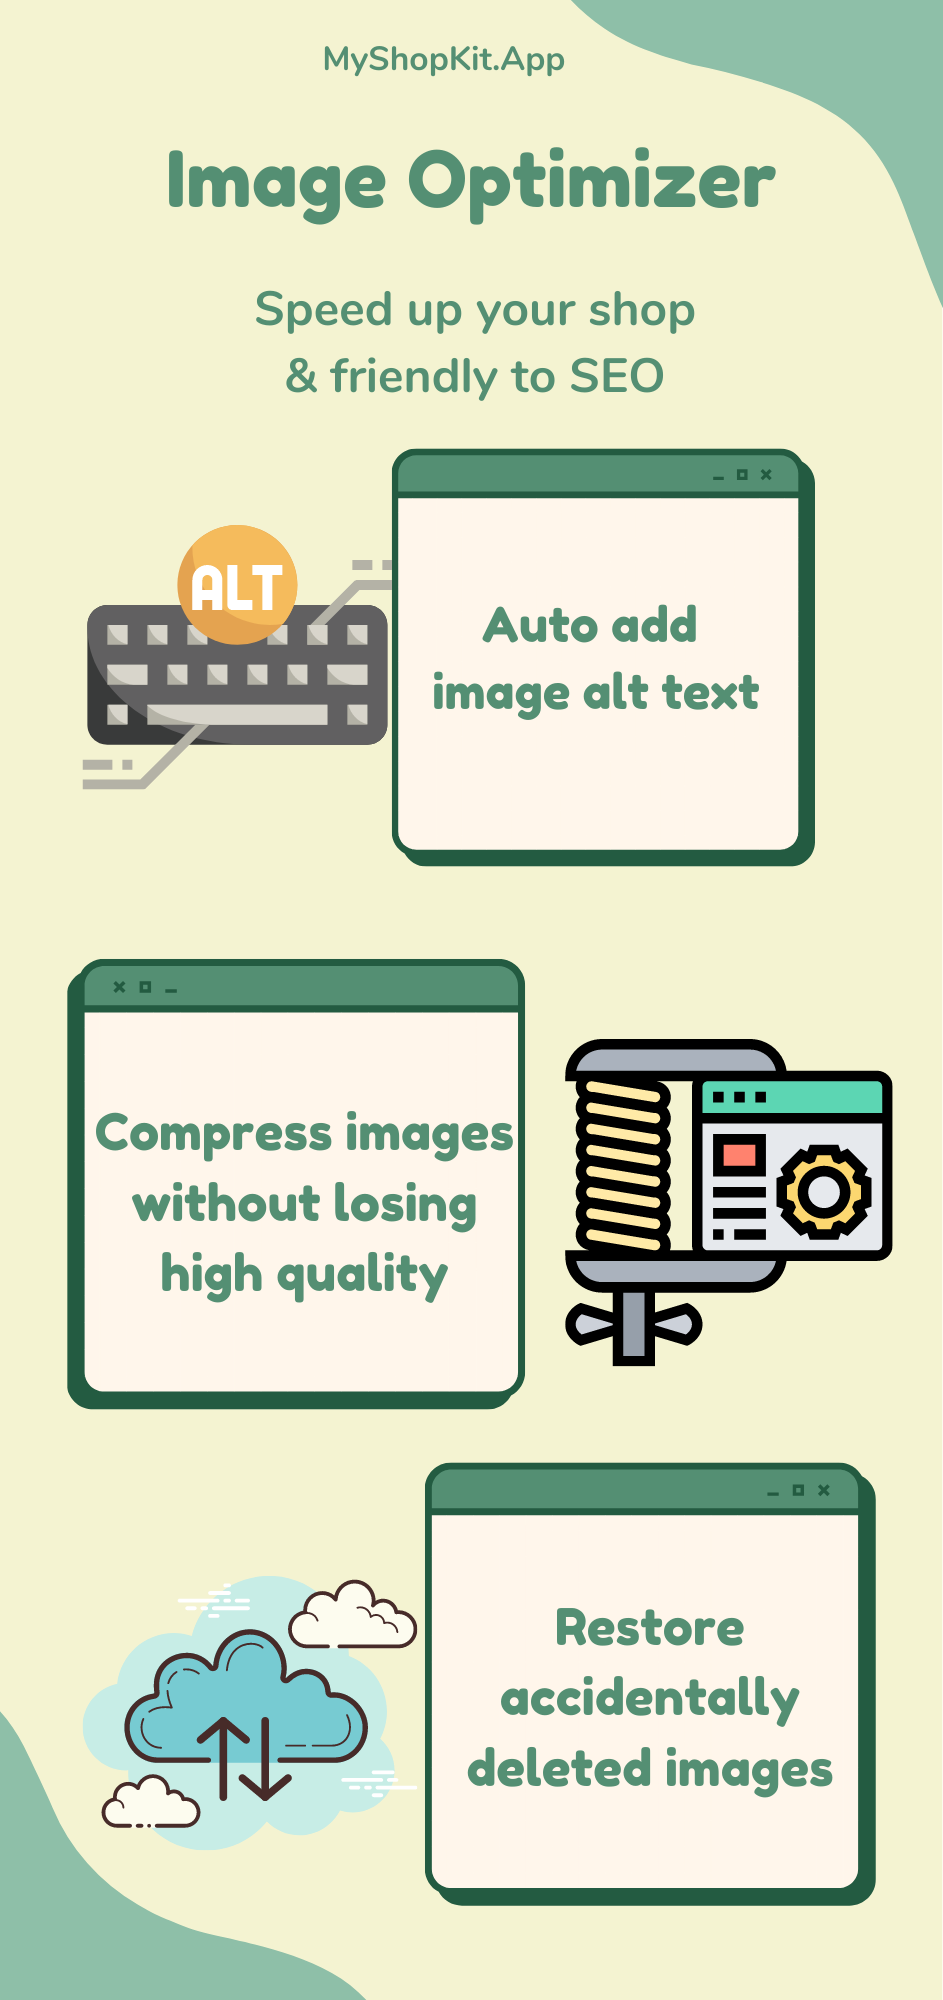
Image Optimizer
Speed up your Shopify store by compressing images without losing quality. Make it SEO-friendly by adding alt text automatically.
FAQs on how to set up Shopify store
How much does it cost to start a Shopify store?
When it comes to Shopify, the larger the monthly price, the lower the processing fee. As for Shopify price plans, you must discover the best option based on the niche you’ve chosen and your sales goals. And, with four monthly packages ranging from $ 29 to $ 1,500 and a range of amenities ranging from gift cards to customized support contacts, there’s something for every niche type.
How to change the Shopify store name?
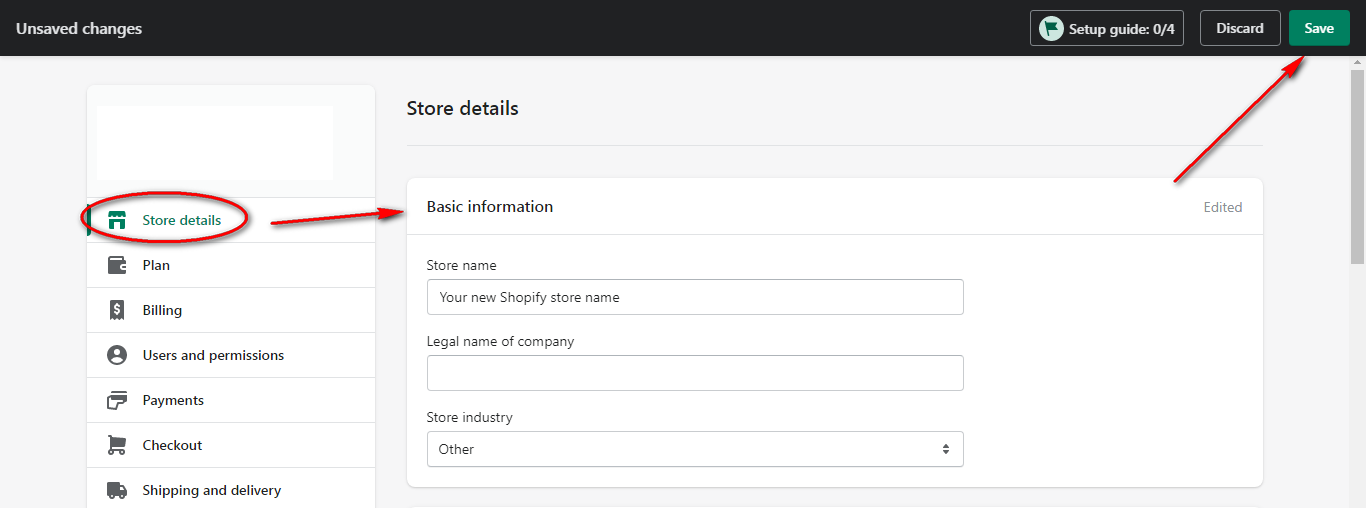
From Shopify admin > Settings > Store details > Edit Basic Information > Change your Shopify store name > Save.
How to export images from the Shopify store?
Downloading a Chrome addon – Tab Save, which enables you to download all of the product images from your Shopify store. After you’ve installed it, visit your Shopify admin and pick all of your items to export as a CSV file.
How to make the Shopify store live?
To make your Shopify store live, you need to pick a pricing plan and remove your storefront password under Online Store > Preferences. There will be no message or confirmation when you remove the storefront password.
Can I hire someone to build my Shopify store?
If you feel unsure about how to set up Shopify store, you can totally hire Shopify experts to help build your e-Commerce store. However, the price of hiring experts may be out of budget. In that case, you can also install a page-builder app such as Veda Builder. You can receive free support from the app’s pro developers.
How to add testimonials to Shopify?
You need to open the store building editor. Under Online Store > Themes > Customize > Add Testimonials > Save. If you can’t find the testimonials section, it means that your current theme doesn’t support the testimonials section. You can change the theme or install the Veda Builder app to add the testimonials section to your current theme.
How to find out what Shopify theme a website is using?
You can use the Shopify theme detector to find out which Shopify theme your competitor is using. Simply copy and paste the URL of that store and wait for a few minutes to see the results.
How to speed up the Shopify website?
You can make your Shopify website faster by compressing product images with the Image Optimizer app. Plus, you should use a fast and responsive theme such as Veda Builder. Also, you should choose to install the app in a small size.
Can you have multiple Shopify stores?
Yes, you certainly can hold many Shopify stores by using different Shopify accounts. However, you are unable to have many Shopify stores on only one account.
How to put a password on the Shopify store?
Under Online Store > Preferences > Scroll down to the Password protection section > check Enable password > Enter your password > Save.
How to market the Shopify store?

From Shopify admin, you will find the Marketing area that enables you to market your store with campaigns and automation. You can also use an Analytics report to analyze customer behavior and therefore have the right marketing strategy.
Why is my Shopify store not found?
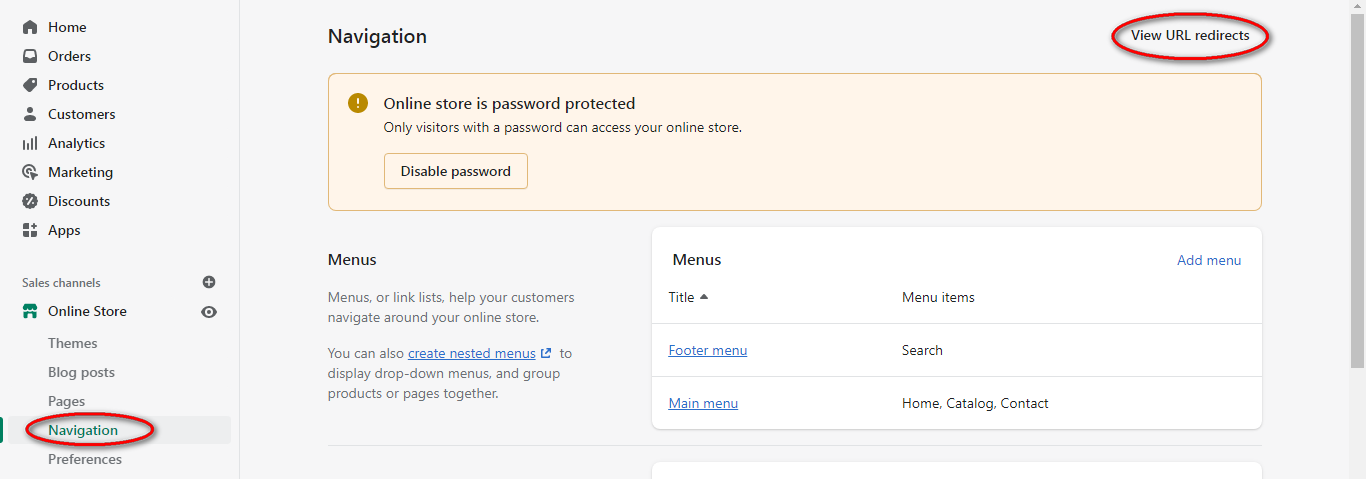
If your shop is inaccessible, check to see if the problem isn’t related to the site itself. Shopify may be unavailable due to routine maintenance or a more serious problem. If it’s maintenance, they’ll normally send you an email ahead of time to let you know.
If your Shopify page is 404 not found, you should redirect that page to a new page.
Under Online Store > Navigation > View URL redirects > Create URL redirect > Save
How to add social share buttons to Shopify?
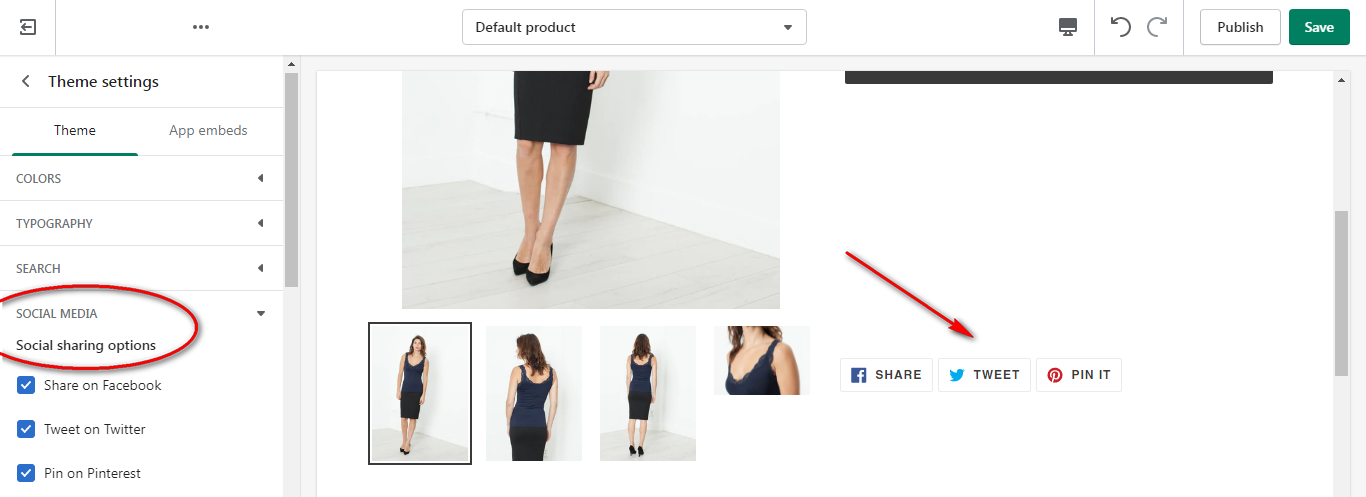
Open the theme building editor and go to Theme settings > Theme > Social Media > Social sharing options > Check all social media options you want to share > Save.
How to add a video to the Shopify homepage?
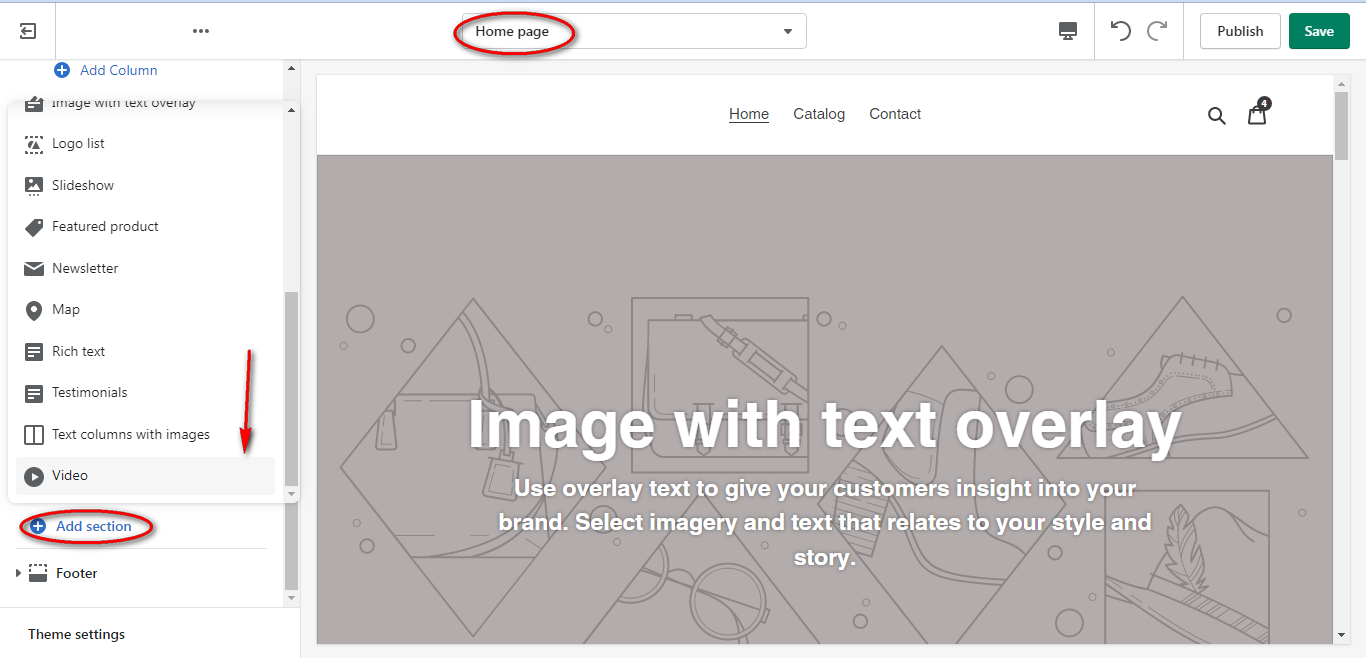
In the theme building editor, go to the Homepage and find the Video section to add. If you can’t find the Video section, click “Add section” to find it.
Final words for how to set up Shopify store
Above are important steps to take to build a successful Shopify store from scratch. If you didn’t find your answer, you can leave a comment below or message us in live chat. We are very pleased to help you make a breakthrough. I hope you can grasp how to start your Shopify store and turn it into a six-figure business soon.
